Author: Bianca

  • Intro to Drafting a Facing and Lining Combo!

    Intro to Drafting a Facing and Lining Combo!

    Drafting a facing and lining combination for a garment, video tutorial | Vintage on Tap

    Drafting a facing and lining combination is not as difficult as it may seem- and the results are gorgeous.

    The reason I love having both a facing and lining in my heartier garments is that I love the professional look and feel: the two pieces together feel more luxurious and intentional.

    There are plenty of garments that include either only the facing- or only the lining, and while there’s no wrong answer, if there’s an option to do both without much trouble, I like to proceed in that route.

    Places where drafting a lining and facing might be appropriate include, (but are not limited to)…

    • Coats
    • Capes
    • Blazers and jackets
    • Summer dresses that want to be winter-ized
    • Skirts

    Interior, lining view after sewing a vintage lining | Vintage on Tap

    Of course, there are always multiple factors to consider when deciding if drafting a facing and lining is right for you or for your project.

    Questions you may want to consider before proceeding with this include:

    • Is the garment simple enough for this not to be a problem?
    • Will this add extra bulk?
    • Is the shell fabric too thin/see through to need that extra layer for opacity?
    • How many sharp curves will I need to manage on the interior layer?
    • Is the facing/lining close enough in size/dimension to the shell garment? (If it’s not)- how difficult is it going to be to proportionally add a lining that corresponds to the shell? (see video tutorial!)

    If the above answers to the questions above sound reasonable, definitely give it a shot on a muslin.

    How to draft a facing and a lining combination. This video tutorial shows you how to get the job done quickly and easily! | Vintage on Tap

    Before beginning…

    Review my following tutorial videos:

    The above tutorials get you prepped and ready for the beginning of this particular tutorial video.

    Of course, every situation and every pattern differ, but if you’re unfamiliar with the above techniques, I highly recommend taking a look!

    This video teaches you how to draft a facing and lining together for your home sewn garments! | Vintage on Tap

    Step One: Eval the type of pattern you’re working with.

    Because each pattern can differ so much, approaching the pattern with a well-thought out, methodical approach is key!

    If your pattern came with just the facing-

    • Tape up any darts or corresponding shell pieces that may affect the area where the facing will be attached.
    • Overlap the facing to the shell piece, to verify if the facing is an exact copy of the shell.
    • If the facing is the same as the shell, perfect, you’re good to go!
    • If the facing is NOT the same size as the shell, note the difference. Ask the following questions:
      • Is the difference between the two a design element?
      • Does the facing serve an additional purpose than just being a facing?
      • How “off” are the two?

    If the facing is substantially different than the shell, you may not be able to draft a lining to it. As I noted above, each pattern can vary widely. But please note, most of the time you can draft a corresponding lining, but you may need to figure out an individual solution for your particular pattern. Please be sure to watch the remainder of the video tutorial to see if it will make sense for your design.

    If your pattern came with just the lining-
    • Verify that the lining matches the shell
    • If the lining is NOT the same size as the shell, note the difference. Ask the following questions:
      • Is the difference between the two a design element?
      • How “off” are the two?

    If the lining is substantially different than the shell, double check that you’ve taped up any darts or tucks that may be in the lining, but not present in the shell. There are occasions when the lining may have additional pleats/tucks/darts, and your facing should (generally) correspond more closely to the shell than to a lining with these sorts of details.

    If your pattern came without either a facing or lining-
    • Trace an additional copy of the shell as your working piece. That’s it ?
    How to draft a facing and lining combo, with video! | Vintage on Tap

    Step Two: Trace your pattern pieces onto a “working” piece of paper

    If your pattern came with just the facing-

    • Trace the shell onto a clean sheet of paper
    • Overlap the facing onto the shell tracing and copy the facing onto it
    • Make sure to transfer all pattern markings

    If your pattern came with just the lining-

    • Trace out a brand new copy of the lining
    • Make sure to transfer all the pattern markings

    If your pattern came without either a facing or lining-

    • Trace the shell
    • Make sure to transfer all pattern markings

    Step Three: Draw in your stitch line

    If your pattern came with just the facing-

    • Measure UP from the bottom edge of the facing the amount of your seam allowance

    If your pattern came with just the lining OR If your pattern came without either a facing or lining-

    • If you haven’t already viewed the How to Redraft a Facing video tutorial, now is the time!
    • Measure DOWN from the top edge of the shell the amount of the new facing you would like to add

    Drafting a facing and lining combo on a garment isn't hard with this tutorial! | Vintage on Tap

    Step Four: Add your seam allowances

    If your pattern came with just the facing-
    • Trace a line above your stitch line, the amount of your seam allowance
    • You should have a total of three lines drawn, parallel to one another

    If your pattern came with just the lining OR If your pattern came without either a facing or lining-

    • Trace a line both above AND bellow the stitch line, the amount of your seam allowance
    • You should have a total of three lines drawn, parallel to one another
    Learn how to make a facing and lining combination piece | Vintage on Tap

    Step Five: Trace the two new pattern pieces from your working paper

    From here, you are home free!

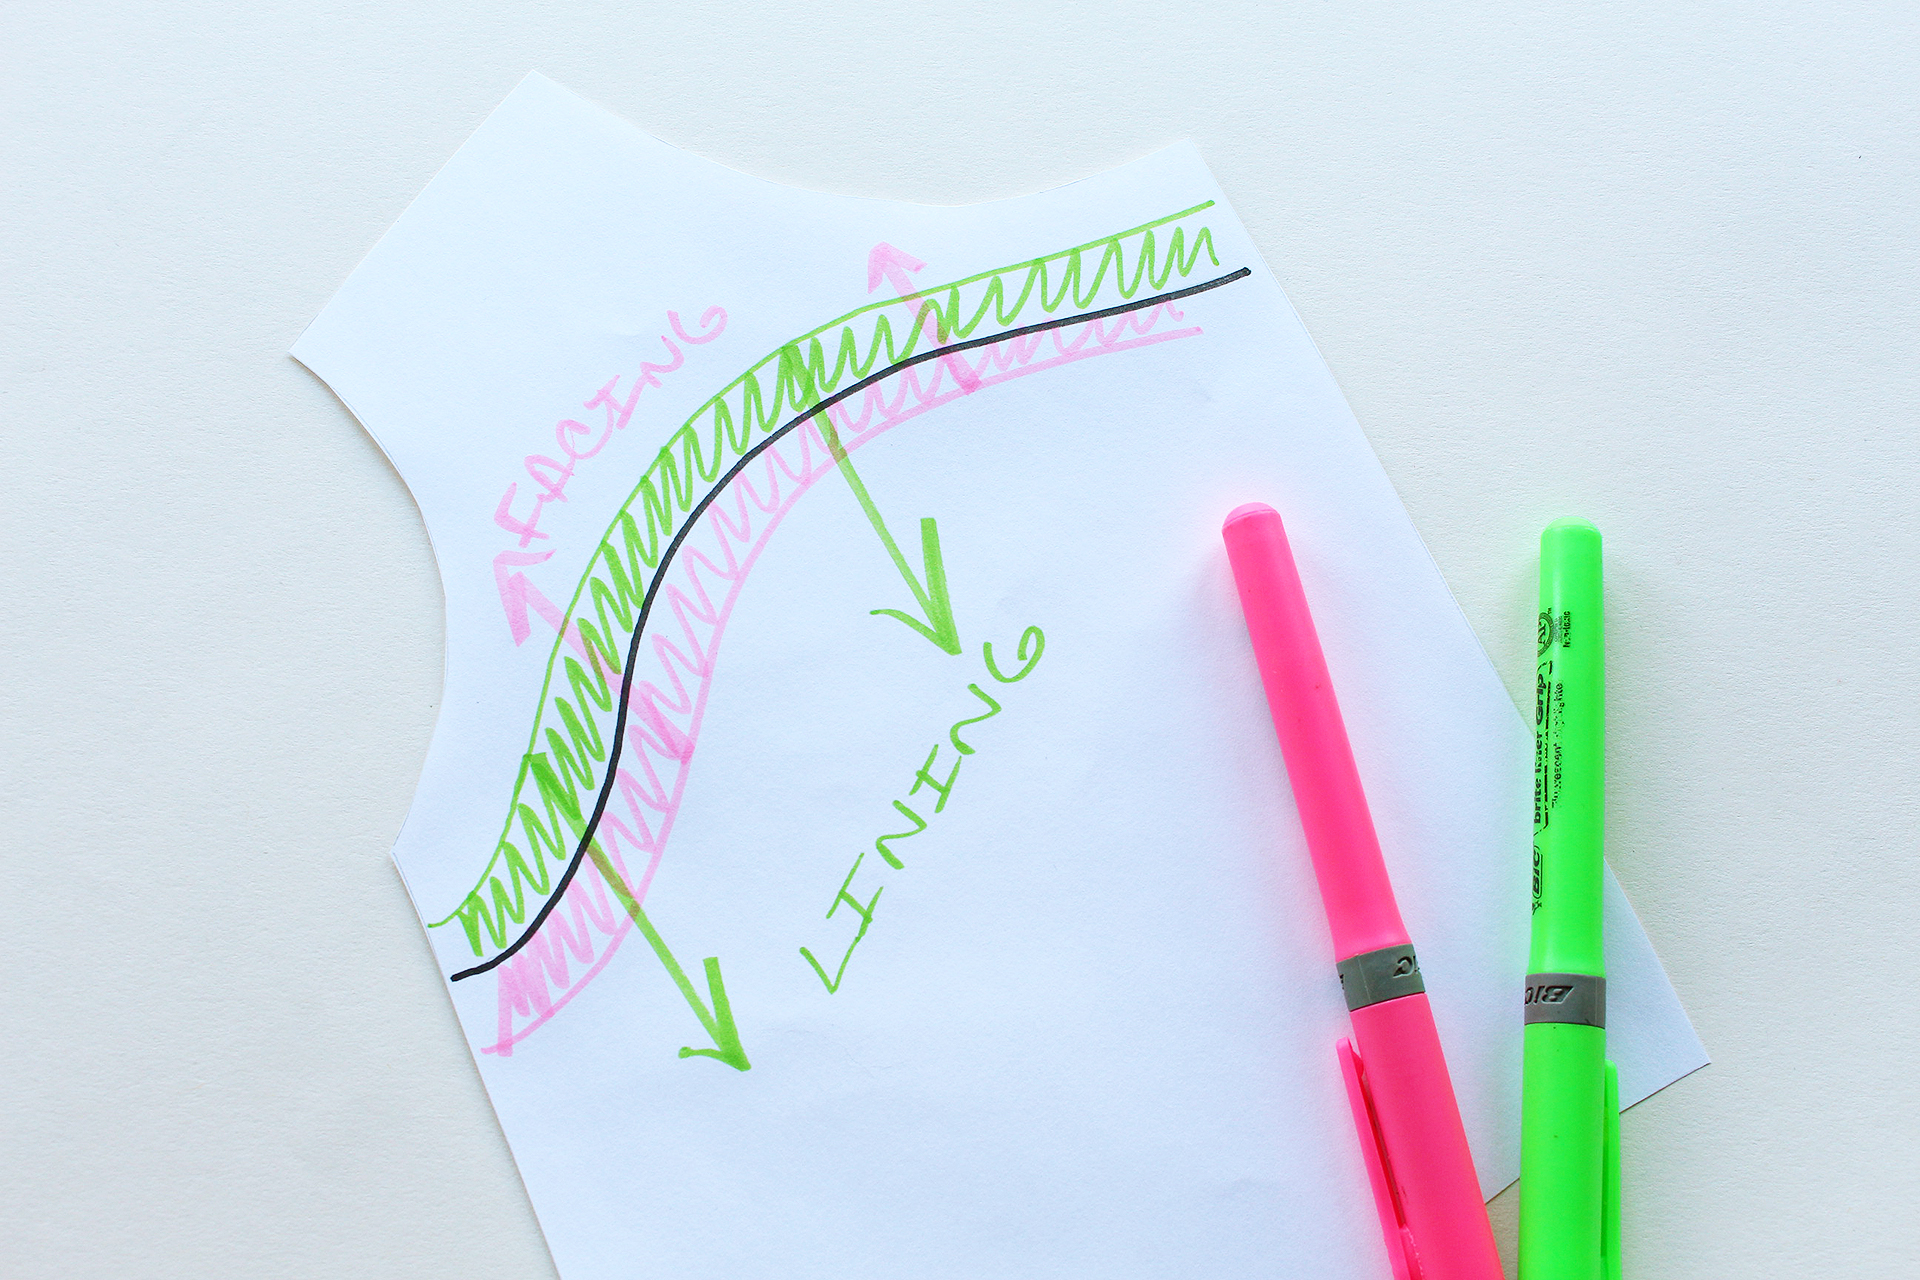
    View the diagram in the photo above, or in the tutorial video for more info as to which seam allowance goes where. Essentially, your three parallel lines correspond in opposite directions:

    1. Lining Seam Allowance 
    2. Stitch Line
    3. Facing Seam Allowance

    Please note that in my video, I discuss the curvature of the stitch line and how that may be difficult to sew. Evaluate the curve in your stitch line in Step Three, before adding your seam allowances.


    All the Places, All the Stuff!

    Never miss a post by following me on Bloglovin’!
    Or go mobile- I’m on Instagram and YouTube!
    Subscribe to Vintage on Tap on YouTube!

  • How to Sew Vintage Vogue 9280

    How to Sew Vintage Vogue 9280

    Collar and front bodice of 1948 Vintage Vogue 9280 | Vintage on Tap

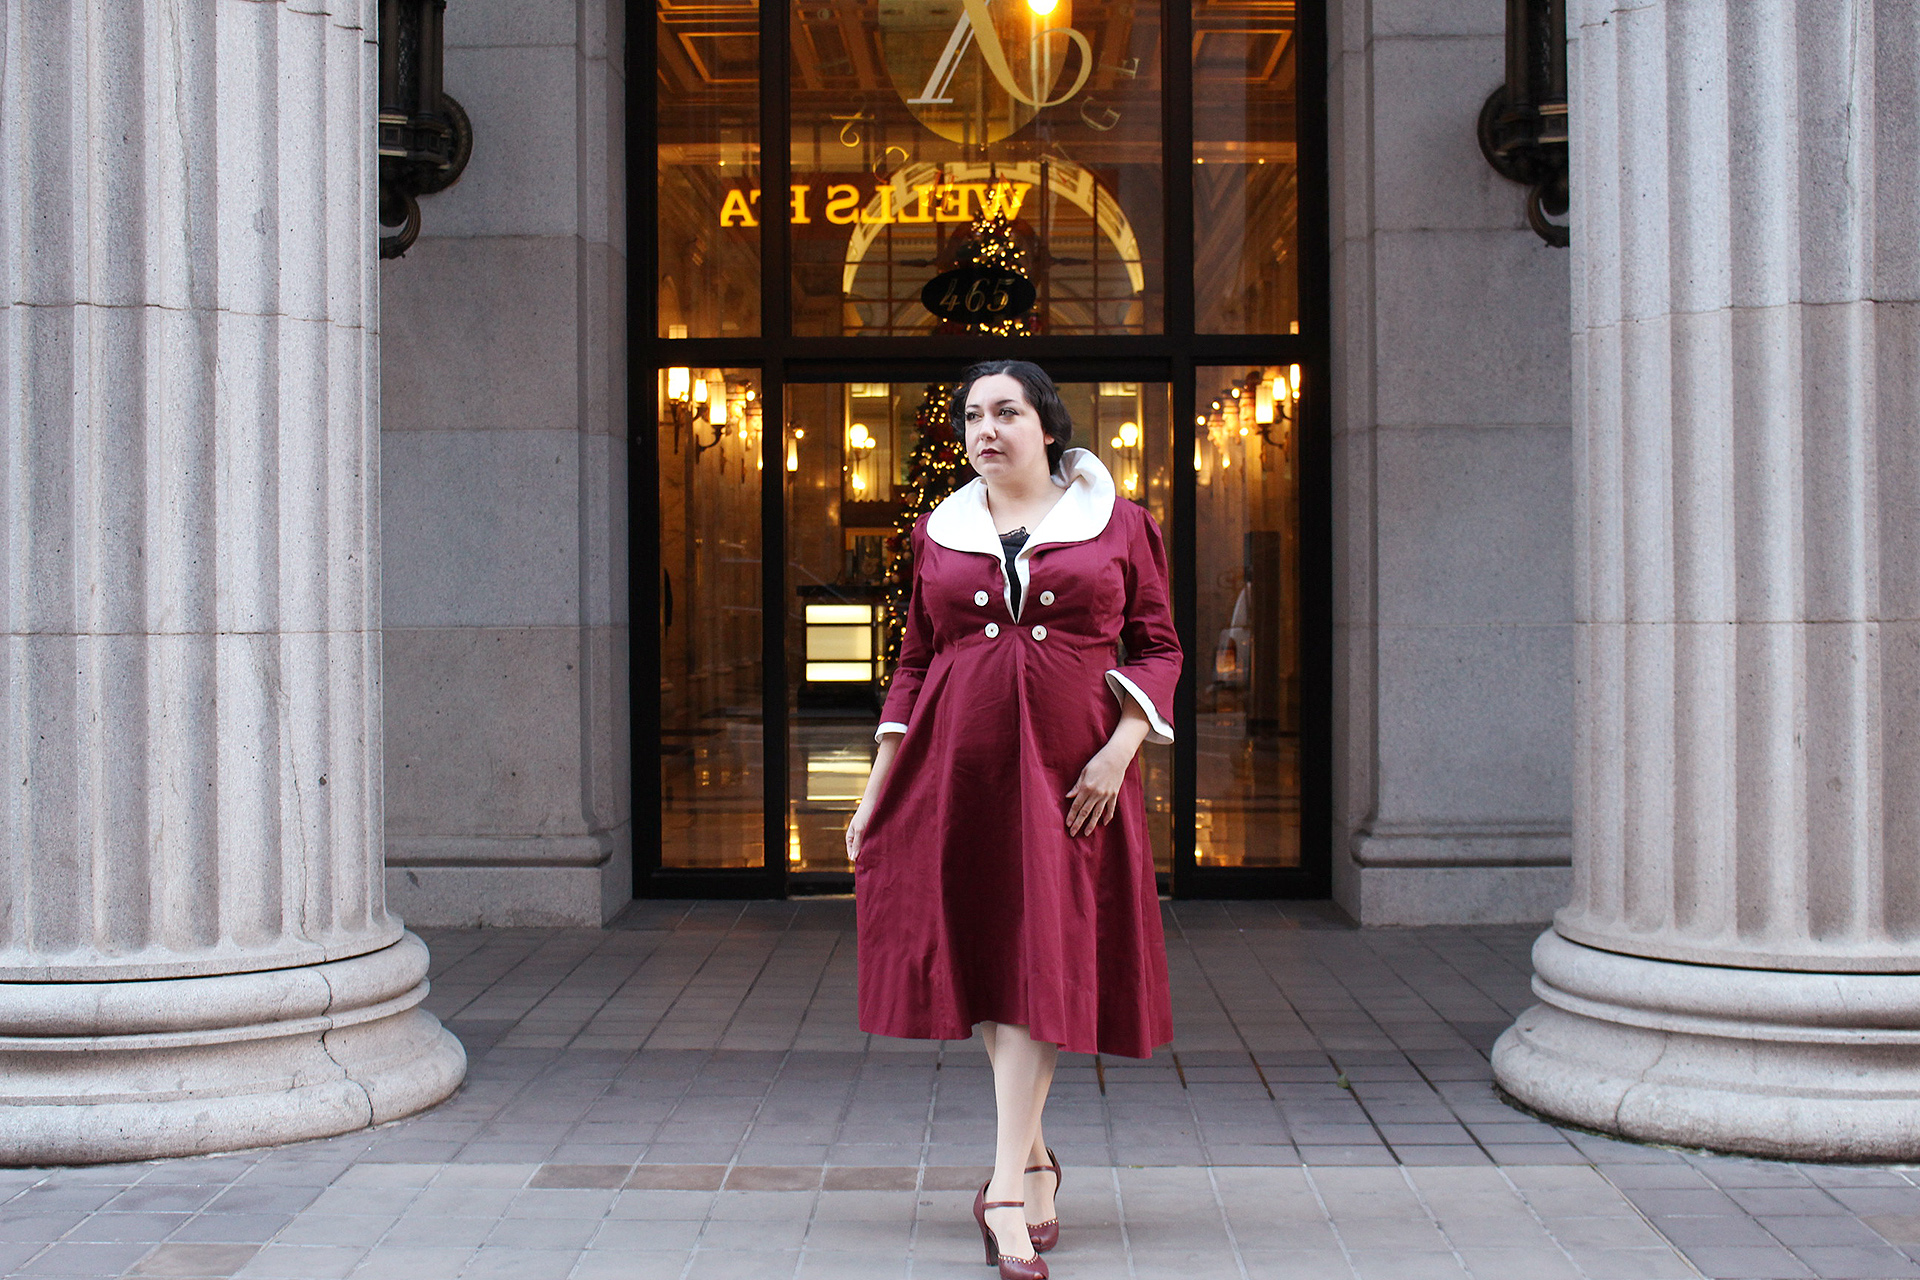
    Can we PLEASE take a moment to admire how epic Vintage Vogue 9280 is?

    If you follow me on Instagram, you know that I’ve been saying this since day one of getting my hands on this pattern. The collar slays me over and over– and I can’t get over how this dress looks like it stepped out of a movie scene in the 1940s.

    Everything about it is over the top, just how I like it. My inner Drag Queen is a happy girl ?

    Sewing tips and video walk through for Vintage Vogue 9280 | Vintage on Tap

    Spending the time sewing this vintage dress makes me appreciate all the intricacies of small techniques that build on one another.

    Full disclosure- there is a lot of hand sewing on this piece. But, there’s something absolutely beautiful about pulling out all the skills you’ve acquired over time, growing them into a head turner piece.

    I can imagine for someone attempting to sew for the first time, it can seem like an unreachable goal. But guess what- you can make it, too!

    1940s vintage sewing, Vintage Vogue 9280 video walkthrough | Vintage on Tap

    Is Vintage Vogue 9280 complicated? Yes and No.

    For intermediate and advanced seamstresses, this retro dress is not a challenge, but more of a process, meticulously working your skills into a finished piece. You can observe the instructions, nod your head in understanding, and jump in.

    For a beginner, though, this dress is a journey. Expect to take your time with it, completing one step at a time with patience, as you push your experience further. Make the dress with love and care, and accept the journey.

    Collar close up, Vintage Vogue 9280 | Vintage on Tap

    Machine sewing, Vintage sewing techniques and walkthrough | Vintage on Tap

    Are there things I would have done differently with this piece? Yes.

    I don’t have a laundry list of changes I would have done, but I have a few points you may want to consider as you’re working on this dress. None of them are particularly difficult, though, and the pattern is very straight from the envelope (and of course after you’ve done your fitting!)

    Vintage Vogue 9280, sewing walkthrough and sewing help | Vintage on Tap

    Consideration #1: Figure out what camisole you want to wear under this dress.

    As you can see in my completed photos, I wore a black camisole since it was the only piece of clothing that I owned that could work with this piece!

    Less than ideal.

    Remember that this dress completely opens up above the waist and is generally form fitting, so whatever is worn underneath should match in some capacity. Also, depending on your bust size, you may see more (or less) of the camisole.

    Vintage Vogue 9280, how to sew 1940s clothing | Vintage on Tap

    Consideration #2: Wear a slip or light petticoat under V9280 for a better flare on the skirt.

    No need to go crazy with a petticoat, but a couple layers of pleated tulle would be enough to give a little bit of a perk to the skirt while you’re swooshing around in it.

    This is particularly noticeable at the center front, where the skirt inadvertently creates a pleat and sort of “sticks out” if you’re standing still. Not really a problem, but a light pannier would be more than enough.

    Vintage Vogue 9280, sewing walkthrough | Vintage on Tap

    Consideration #3: Re-Fit the dress before committing to the side closure.

    This point is probably my biggest note, especially after having fitted the dress earlier in the video series.

    Essentially what you need to consider is that when you’re matching up the center front of the dress during the fitting, you’re assuming that the center front will overlap- but it doesn’t when worn.

    The center front is completely open once the piece is sewn up, causing the top of the dress to open up naturally and create a lot of extra ease in the side seams.

    Suggestions to “fix” the issue:

    • Stitch further up the center front seam, closing up the center front (will require drafting changes to the collar pattern pieces)
    • Attach some sort of closure to the back of the detachable collar piece, to close the center front and bring in the extra fabric at the side seams
    • Nip in the side seams, committing more to the open-front look (may require redrafting a muslin with the collar open more realistically)

    1940s Vintage Vogue 9280, learn about retro sewing with this video walkthrough | Vintage on Tap

    You can see in my images that there are some gathers/extra fabric under my breasts at the side seams, which I’m guessing is because of this design feature— as well as the weight of the collar (each lapel had 6 layers of fabric.)

    If I were to make this again tomorrow, I would opt for closing up the center front so I could kill multiple birds with one stone: not need a camisole and get a better fit under the breasts. 

    Hand sewing, Vintage sewing techniques and walkthrough | Vintage on Tap

    What I appreciated the most about Vintage Vogue 9280 was the lack of corner-cutting in the instructions.

    Hand sewing everywhere, bound button holes (watch the Bound Buttonhole video here), waist stay, side snaps, and sew-in interfacing! Of course, to a strictly modern seamstress, all of it may seem excessive, but if you’re into doing it old school, this pattern has it all.

    Even the shoulder pads are made from scratch. And they are amazing. I may have to make myself an additional set to properly finish my Butterick 6282 US Navy Dress.

    1940s Vintage Vogue 9280, learn about retro sewing with this video walkthrough | Vintage on Tap

    Pinning bodice, Vintage Vogue 9280 | Vintage on Tap

    Bodice interior, Vintage Vogue 9280 | Vintage on Tap

    Embrace the sewing techniques.

    Sew-in interfacing is (arguably) easier to deal with than iron-on. Simply cut and baste and in a similar way as underlining, and the “interfacing” lends its qualities to the shell fabric.

    In my case, I went with the pattern suggestion of using muslin, which lended a stable but soft feel to the collar pieces without being unnecessarily stiff.

    Collar close up, Vintage Vogue 9280 | Vintage on Tap

    Collar interior, Vintage Vogue 9280 | Vintage on Tap

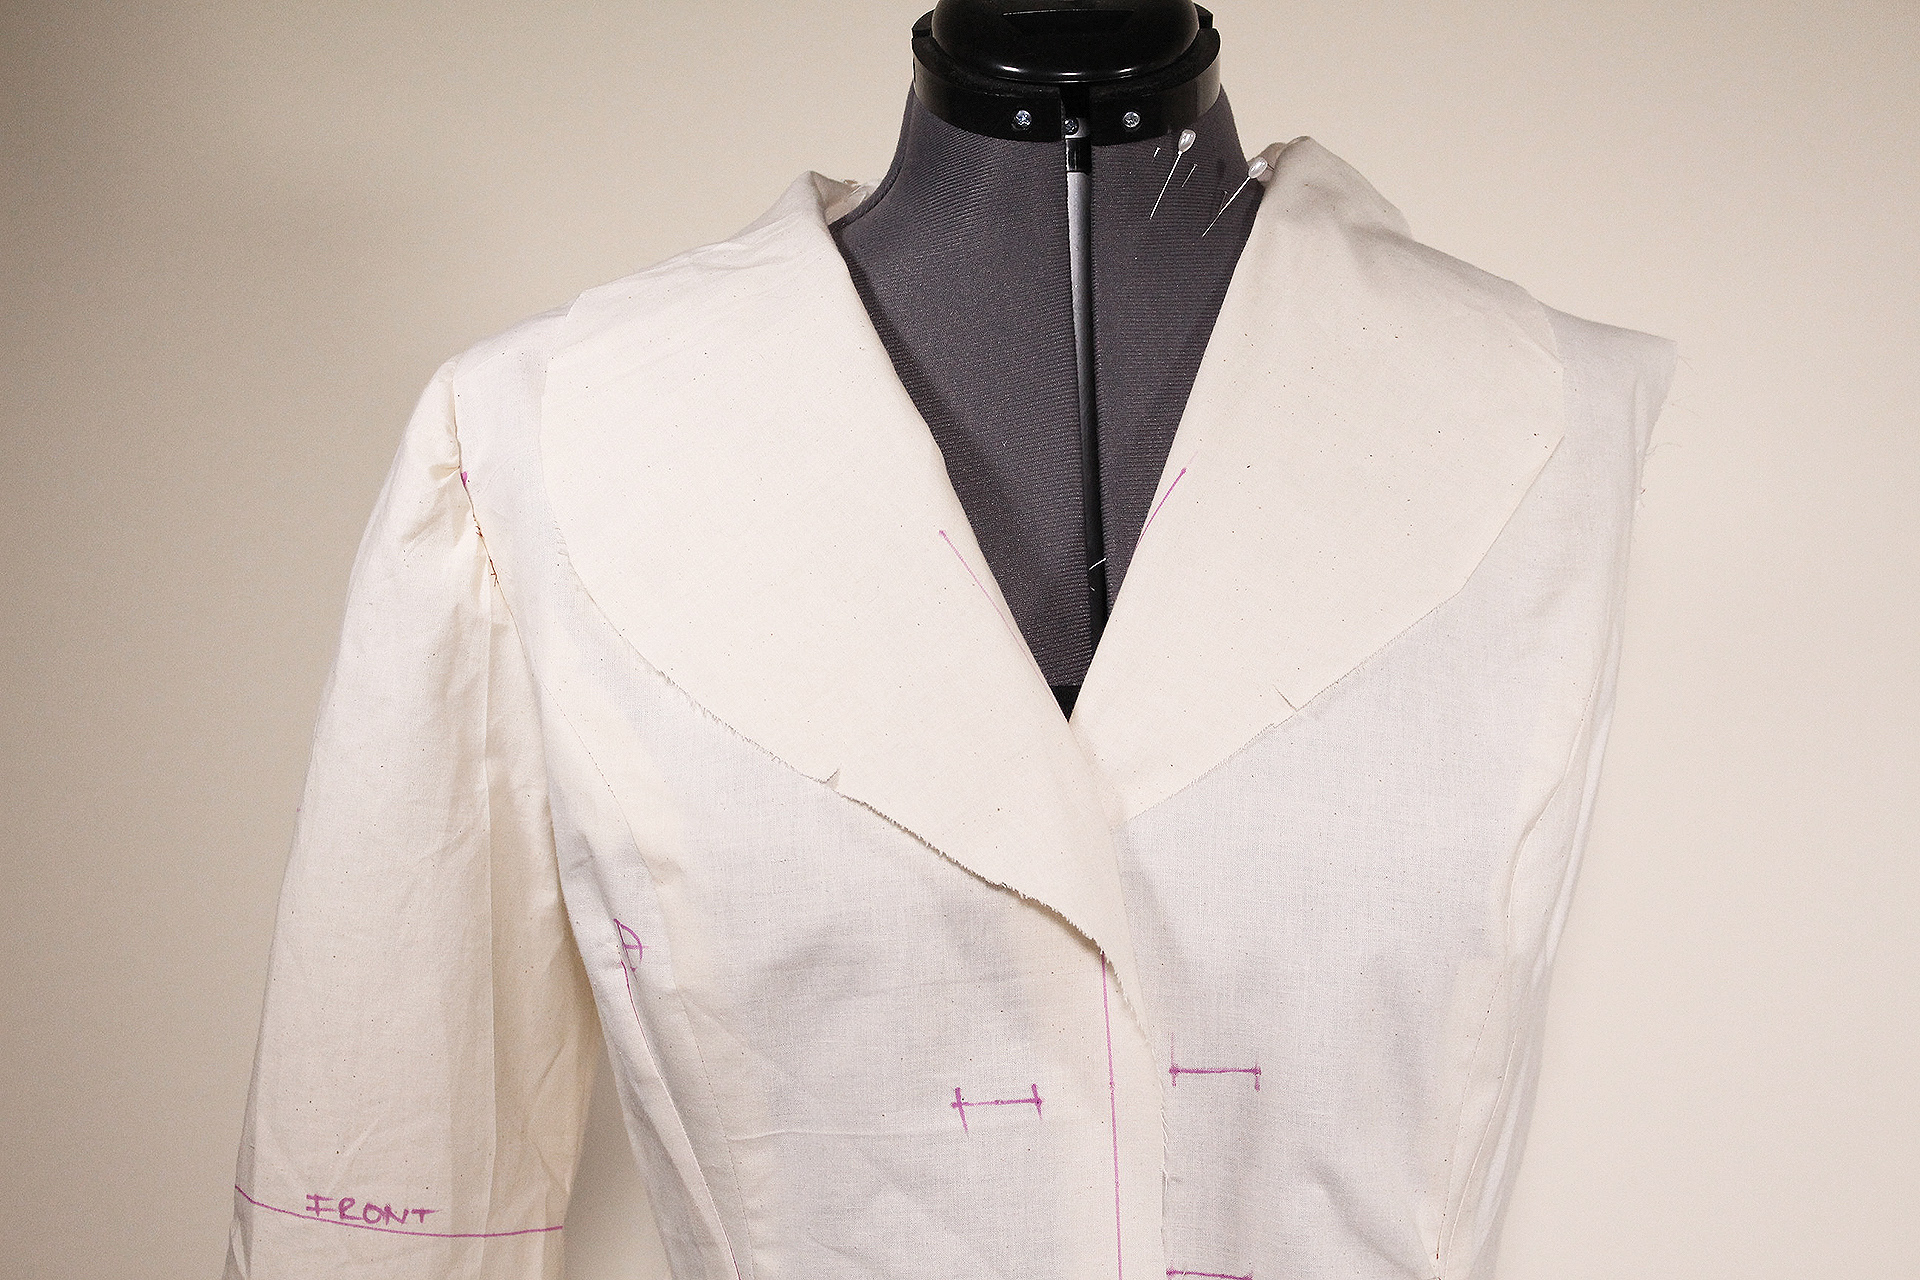
    Take care to match up your collar pattern pieces as closely as possible. With this style of collar, the drama makes any inconsistencies obvious. If you’ve had to make changes at the pattern level, be sure to walk your pattern pieces until you’re confident you’re good to go.

    Back view, Vintage Vogue 9280 | Vintage on Tap

    The only modern change I would make to the materials list would be a square piece of iron on interfacing at the center back pleat.

    Unfortunately the weight of the Vogue 9280 skirt is immense and I had to go back several times to try and reinforce that pulling point.

    You can see from the drag lines, the weight of the skirt is being yanked down at that point, even after reinforcing the pleat to the center back darts.

    Vintage Vogue 9280, how to sew 1940s clothing | Vintage on Tap

    All in all, Vintage Vogue 9280 was challenging but in a good way.

    When I unfolded the directions, I turned to look at Jose and said something to the effect of… “This one is going to be a biggie.” — it didn’t disappoint and is probably one of the longest videos we’ve ever filmed!

    For such a luscious retro piece, I’m happy to own it and to be able to pull it out of my closet for a night out with friends, sipping champagne and being fabulous.

    Vintage Vogue 9280, sewing walkthrough | Vintage on Tap

    1940s vintage sewing, Vintage Vogue 9280 video walkthrough | Vintage on Tap

    Pin this Post!!

    How to Sew Vintage Vogue 9280, from the 1940s. This is a full video walk through on how to make this vintage reproduction dress. | Vintage on Tap


    This post is part of the Vintage Vogue 9280 Video series! Check out the other installment of this series by clicking the image below:

    Sewing Vintage Vogue V9280 video series! This series breaks down the fitting and sewing process for this 1940s piece | Vintage on Tap

    Subscribe to Vintage on Tap on YouTube!

    Thank you, McCall’s Pattern Company, for making this video series and collaboration possible!

    All the Places, All the Stuff!

    Never miss a post by following me on Bloglovin’!
    Or go mobile- I’m on Instagram and YouTube!

  • Bound Buttonholes Through a Lining or Facing, Video Tutorial

    Bound Buttonholes Through a Lining or Facing, Video Tutorial

    How to Sew Bound Buttonholes through a facing or lining, video tutorial | Vintage on Tap

    Bound buttonholes can seem intimidating, but they don’t have to be.

    The fear of bound buttonholes seems to lay in the perceived amount of steps that go into the process.

    To be honest, there aren’t as many steps as you might think. 

    Adding fuel to that fire is that there are multiple ways to sew bound buttonholes. With the sheer amount of ways to get the job done, anyone encountering the technique for the first time can be intimidated.

    For me, I was put off from them for a long time because I kept using a tutorial that was making it harder for me to understand the concept, not easier.

    At one point I had made over 20 buttonholes and they all kept coming out wrong.

    I was using what I’m dubbing the “two lips” method. With that technique, you were instructed to cut out two tiny lips and then attach them to the buttonhole and in the process, becoming stressed out and angry.

    Yikes.

    Sewing bound buttonholes should not make you angry.

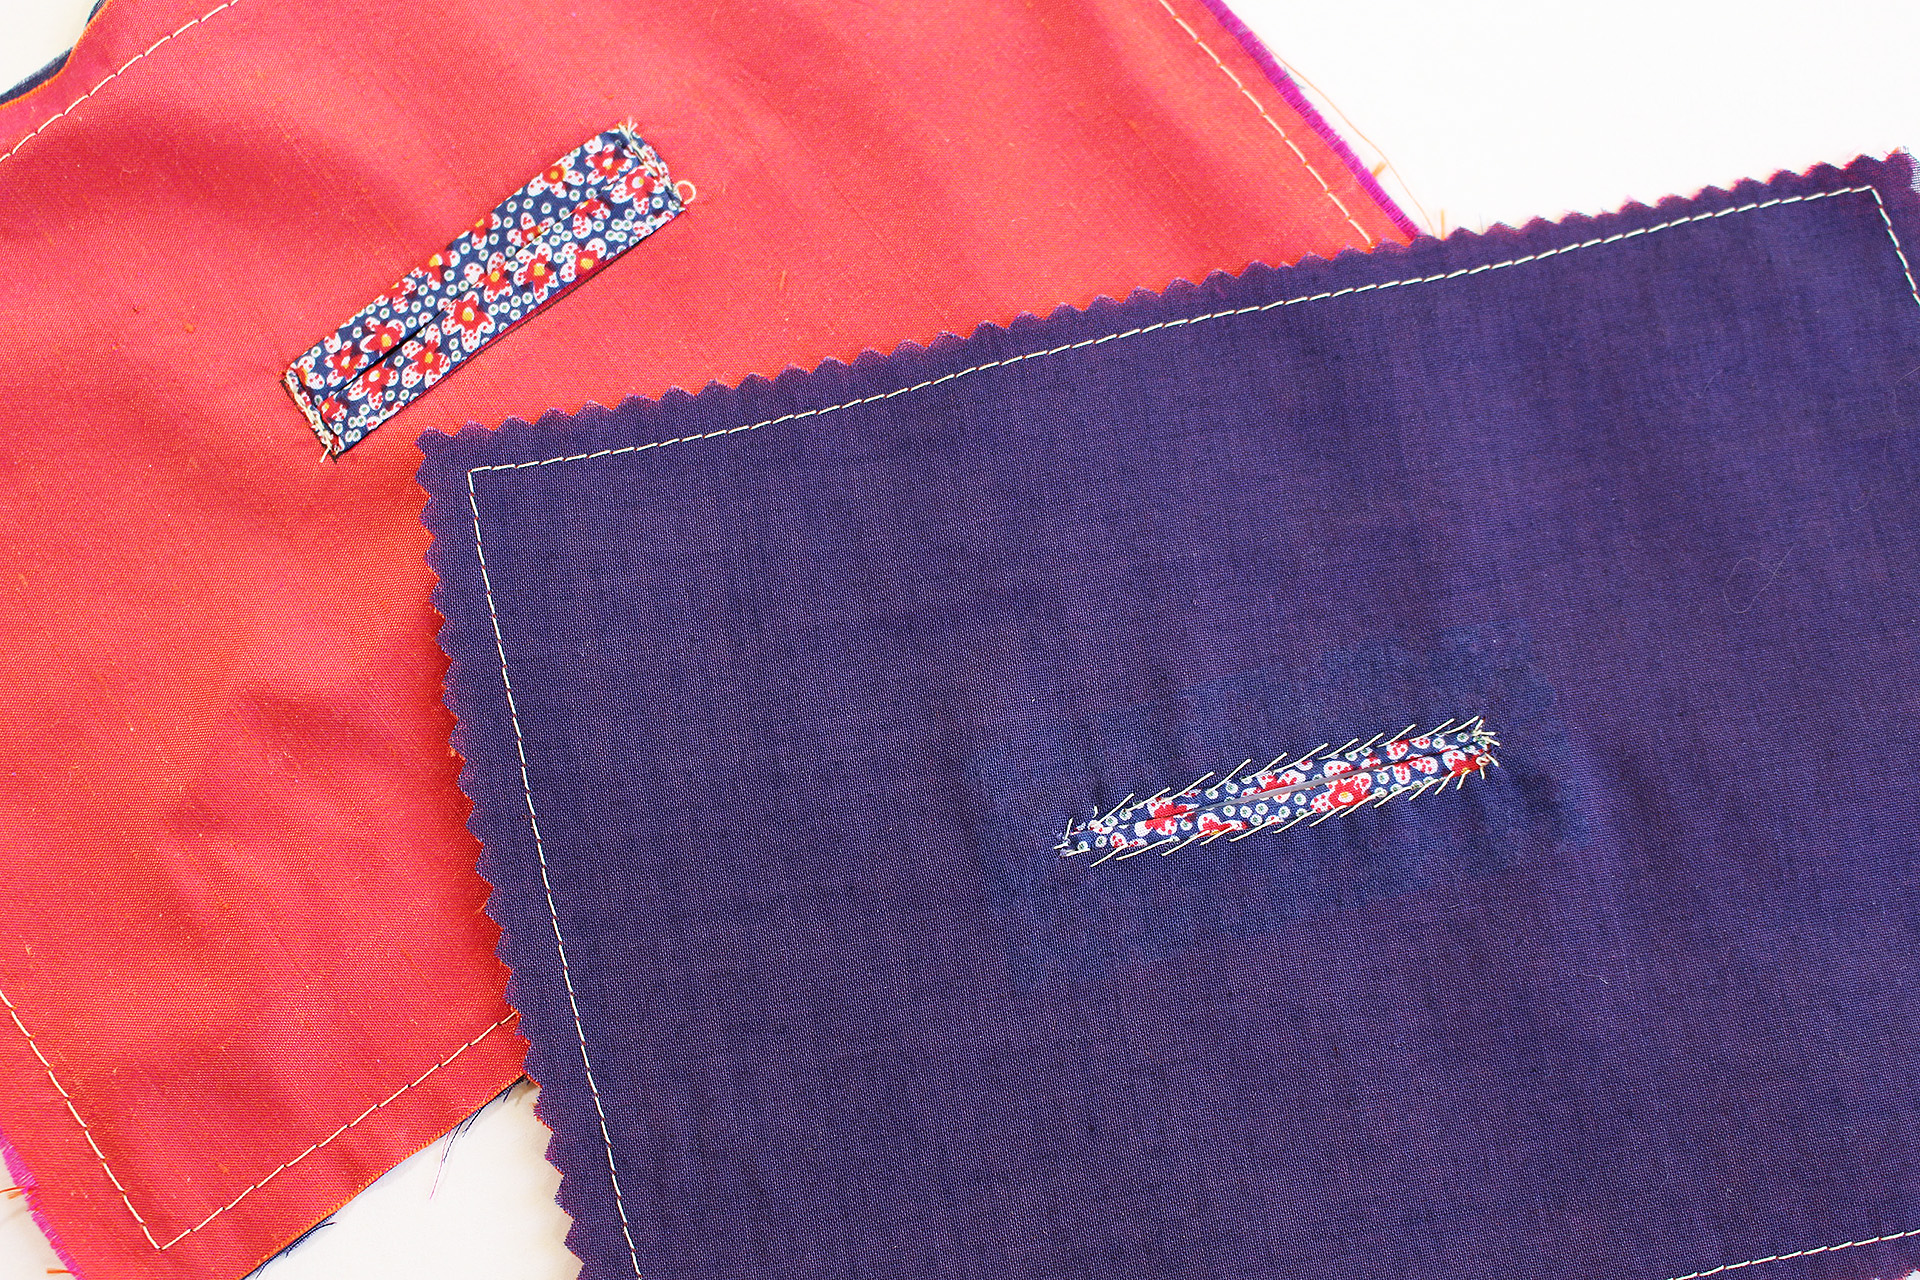
    Bound buttonhole close up, showing you what the completed button looks like | Vintage on Tap

    When getting started with bound buttonholes, expect to make multiple samples before tackling your fashion fabric.

    Ultimately, practicing ANY new technique, it’s a good rule of thumb to go through at least four or five iterations. One or two iterations to mess up the technique entirely, but then by the time you get to version five+, the process looks and sews cleaner and more gorgeous.

    Setting up a bound buttonhole sample, perfect for practicing a vintage-style technique for a better buttonhole! | Vintage on Tap

    Step One: Sew your bound buttonhole rectangles.

    In my video tutorial, my rectangles were 2in x .5in (5.08cm x 1.27cm.)

    Trace your rectangle onto both your fashion fabric and the fabric that I’m dubbing the “lips” of the buttonhole. Using a couple pins, line up both rectangles as closely as possible (timestamp 1:30) and then pin the two layers of fabric together.

    Sew along the rectangle, all the way around. Start and end your stitches as exact on the corners as possible.

    Marked rectangles for a bound buttonhole. This video tutorial shows you step by step the sewing process for this vintage technique! | Vintage on Tap

    Step Two: Mark your cut lines, cut, and turn inside out.

    Starting at timestamp 2:38, draw your cutting lines. You need one line directly down the middle of the buttonhole, then as you approach the corners, create Y-shape from the center line to the corners.

    Making a quick snip into a bound buttonhole guide line, making the opening for this technique | Vintage on Tap

    Using a pin, find the center of the bound buttonhole (timestamp 2:50) and then snip down the guidelines, careful not to cut through your previous stitch line.

    Carefully turn inside out.

    Snipping through the center of bound buttonholes is definitely not scary! Practice this technique for perfect bound buttonholes | Vintage on Tap

    Snipping guide lines on bound buttonholes. Learn how to make bound buttonholes with this tutorial! | Vintage on Tap

    Turning a bound buttonhole inside out. | Vintage on Tap

    Step Three: Tack your Bound Buttonhole “lips” in place.

    Inside out tab for bound buttonhole. | Vintage on Tap

    At your iron, press the buttonhole lips in place, taking care that the corner tabs are laying correctly (timestamp 4:53.) Also be sure that your buttonhole lips are straight and look correct from the right side.

    When everything is pressed and pinned, stitch the short ends of your buttonhole, through all layers, stitching “in the ditch” (the crease.) This step will keep the buttonhole from pulling open and and will tack everything in place, timestamp 6:34.

    Trim from the wrong side any excess buttonhole lip fabric, leaving roughly 3/4″in around the buttonhole.

    Press!

    If you’re attaching a facing or lining to your bound buttonhole…

    Be sure to complete the steps above before attaching the facing or lining. You want to be sure the shell is prepared with its buttonholes so you can focus entirely on the facing/lining.

     Tacking down facing and lining to bound buttonholes, stabilizing the area for finishing the area. | Vintage on Tap

    Step Four: Stabilize the facing or lining around the bound buttonhole.

    After sewing your lining or facing to the garment as a whole, pin the facing/lining approximately 2in (5cm) around the buttonhole.

    The exact amount of pins or the exact distance is not important, however, you’re aiming for the facing/lining to not wiggle or pull during the remaining process. 

    Using pins at the edges of the bound buttonhole, identify the center of the buttonhole, timestamp 7:34.

    Back of bound buttonhole, specifically sewing the stitching attaching the lining or facing. | Vintage on Tap

    Step Five: Cut through facing/lining and handsew in place.

    Carefully snip through the facing/lining, careful not to cut through the lips of the buttonhole. Cut all the way to the edges of the opening.

    Fingerpress the facing/lining approximately 1/16in-1/8in (0.15cm – 0.32cm) under, pinning it carefully in place. Hand sew the facing to the lips of the buttonhole.

    Press and admire your work!

    Sewing bound buttonholes does not have to be a chore.

    If anything, with this type of technique you can consistently make something small but beautiful. For me personally, because I tend to use older machines with considerably janky-er buttonhole attachments, this comes out more beautifully long term. It also gives my sewing more of that Intentional Vintage Sewing look, elevating it past the standard machine made buttonhole.

    Have you made bound buttonholes before? What was your experience?

    Pin this Post!!

    How to Sew Bound Buttonholes Through a Facing or Lining, video tutorial and walkthrough for making perfect buttonholes in your favorite coat! | Vintage on Tap


    This post is part of the Vintage Vogue 9280 Video series! Check out the other installment of this series by clicking the image below:

    Sewing Vintage Vogue V9280 video series! This series breaks down the fitting and sewing process for this 1940s piece | Vintage on Tap

    All the Places, All the Stuff!

    Never miss a post by following me on Bloglovin’!
    Or go mobile- I’m on Instagram and YouTube!
    Subscribe to Vintage on Tap on YouTube!

  • How to Fit the 1948 Vintage Vogue 9280!

    How to Fit the 1948 Vintage Vogue 9280!

    Vintage Vogue 9280 is a gorgeous dress. Learn how to fit this 1948 retro dress. | Vintage on Tap

    This post is part of the Vintage Vogue 9280 collab video series with McCall’s Pattern Company! To learn more about the series, including the accompanying Sewing Compendium for this series and GIVEAWAY, check out the intro post! 


    Fitting Vintage Vogue 9280 isn’t particularly tricky, but it can seem that way since it features five darts AND a princess seam.

    The major fitting aspect of this piece lies in the princess seam, with the other darts each deserving different consideration.

    Under lapel shaping darts for Vintage Vogue 9280. Fish eye dart and regular dart for a great fit on this retro dress! | Vintage on Tap

    On the bodice front, the shoulder darts help the collar lapels fall elegantly open and aren’t particularly adding more to the fitting experience. Same goes for the dart at the side front, which (from my observations) seems to assist in molding the dress around the bust, which I love.

    With Vintage Vogue 9280 being a 40s retro sewing piece, the extra molding makes sense. The dart is aiming for a close fit and tight silhouette with light ease; the side front dart really helps nip in the design. It actually reminds me of my Butterick 6453 fitting video, where a regular princess seam wasn’t enough to really get that nipped in waist, and I had to do some additional molding to make that look work on my body.

    Center back dart for inverted pleat on Retro V9280. Muslin tutorial for sewing this garment to fit. | Vintage on Tap

    On the bodice back, the darts in the back come together for the inverted pleat design. (For the purposes of the muslin, I did a simple stitch to close up the center back in order to fit the piece. However, where the two darts meet, the pleat will open.)

    Also, the shoulder darts create a warm rounded design, which seem to help the shoulder look more distinct in combination with a shoulder pad.

    Princess seam detail along with large lapel and shoulder detail. This 1948 retro Vintage Vogue 9280 fitting tutorial will help this piece fit. | Vintage on Tap

    With all of that said, start fitting the princess seam before altering any other darts right away.

    As with most of my tutorials, besides doing a swayback adjustment, I did few changes to the other darts and focused almost entirely on the princess seam to accommodate my full bust.

    Pattern drafting and sewing tools | Vintage on Tap

    Before getting started, get your tools ready:

    Also, review the following videos:

    Other prep work to do before jumping in:

    • Using the hip adjusting line, cut the bodice from the skirt. For this tutorial, you’ll be working on the bodice only, which is more complicated than adjusting the skirt later on. Isolating the bodice will make it easier to adjust and then reattach later.
    • Find a couple larger shoulder pads for fitting purposes- OR- do like I did and find a couple of my boyfriend’s socks and roll them up for some make-do shoulder pads.

    Front view of Vintage Vogue 9280 first version, size 16 out of the envelope. Learn how to make this dress fit with this tutorial! | Vintage on Tap

    Step One: Select your size and stitch up your first muslin

    Taking time to select your Vintage Vogue 9280 size is generally straight forward in that the bust is the key, as it affects the “frame” of the garment, which includes the neckline and shoulder, both which are harder to fit than the waist. 

    My measurements are below:

    • Full Bust: 41in/104cm
    • High Bust: 38in/96.5cm
    • Waist: 33.5in/85cm
    • Hips: 42.5in/108cm
    • Torso Length: 15in/38cm
    • Height: 5’2?/157cm

    I selected a size 16 due to my high bust measurement, which matches the listed bust measurement for this design. If you’re like me and have a larger bust, a full bust adjustment (FBA) adds extra width to the waistline! Worry about the waistline after you’ve completed your FBA for a better fit.  

    From there, sew your first half muslin- straight from the packet, to take in the design, and observe how it fits over your body before deciding what adjustments will be necessary.

    To watch this step, jump to 1:45 in the tutorial video to see what Size 16 looked like on me, straight from the packet.

    How to pattern draft, video tutorial | Vintage on Tap

    Step Two: Start Plugging away your pattern adjustments, one at a time.

    Vintage Vogue 9280 uses the standard McCall’s Patterns block, so in my case I knew what adjustments to do right away. However, if you’re still playing around with pattern drafting in general, approach it in the following order, using the following questions:

    Starting with the bodice back (in order):

    • Does the center back line of the pattern go straight down your body’s center back line?
    • Is there pulling at the shoulders?
    • Where does the waist line sit compared to your natural waist?
    • Is there pooling of fabric at the bottom of your back?

    Note: Before hacking into the pattern, compare the collar facing and contrast collar pattern pieces to the center front pattern piece, to notice how big they are compared to one another. Any changes you do on the center front will need to be done to these corresponding pieces once the whole process is complete.

    In my case, I identified that I needed to shorten my waist by approximately 3/4in (1.9cm), which I cover at timestamp 2:02. Also, I had to do a swayback adjustment of approximately 1/2in (1.27cm)

    Make your next half muslin at this point.

    Pattern drafting video tutorial for princess seams | Vintage on Tap

    Step Three: Take special care with the bust area.

    Turning to the front pattern adjustments, the main thing to consider before changing neck, arm scythes, shoulders, waist— is the center front line between the neck and bust and whether or not the fullest area of the bust in the muslin matches your body.

    Note: The front bodice notches are extremely important for Vintage Vogue 9280, so if you haven’t yet reviewed the Walking a Pattern video, now is the time!

    In my case, I saw that the fullest part of the pattern bust fit me great. Then, I measured a distance of 2in (5.08cm) in order for the muslin to fit towards my center front, covered at timestamp 4:32 in the video. The pattern bust point (identified in the side front pattern piece) generally fitting the correct area, meaning I only had to add to the center front pattern piece.

    If you’re doing an FBA, slash a straight line up the pattern, curving slightly towards the shoulder, spreading open the pattern (with hinge,) covered at timestamp 4:55.

    After the FBA is complete and you’ve walked your princess seams, stitch up a full muslin.

    Vintage Vogue 9280 is a gorgeous dress. Learn how to fit this 1948 retro dress. | Vintage on Tap

    Step Four: Determine what final adjustments you may need.

    Questions you might ask yourself for Vintage Vogue 9280 include some of the following (in order):

    • Does the center front match your body’s center front? If not, where? (If at the waist, add extra at the side seams, not the center front)
    • Does the shoulder point (with shoulder pad) match your shoulder point? (If not, determine how much or how little to add or remove from the shoulder or sleeve cap)
    • How does the sleeve look in comparison to your arm? Do you need to narrow or widen it?
    • Is the arm scythe comfortable?
    • Do you have enough wearing ease to move comfortably around in?

    After you’ve done any final small adjustments, be sure to transfer your center front bodice changes to both the collar facings and collar contrast pattern pieces. Be sure to account for notches, length, and FBA (or SBA.)

    At this point, you can tape your bodice pieces back to their corresponding skirt pieces, widening the skirt if necessary.

    Retro sewing, Vintage Vogue 9280, how to fit a muslin | Vintage on Tap

    The key for more “complicated” pieces such as Vintage Vogue 9280 is to break down the fitting process into one adjustment at a time.

    Looking at patterns that include lots of bells and whistles can absolutely scare beginners from tackling more advanced projects. I’m here to say… it definitely doesn’t have to be that way. Listing each adjustment in a properly defined order allows you to tackle each thing, feeling like you’re making headway and have a good grasp of the pattern.

    Lapel and shoulder detail on Vintage Vogue V9280. The shoulder features shoulder pads to give it a more 40s look. | Vintage on Tap

    Do you have any questions or comments about this process? Please leave them down in the comment section below!

    Pin this Post!!

    How to fit Vintage Vogue 9280 video tutorial, a retro dress from 1948 | Vintage on Tap


    This post is part of the Vintage Vogue 9280 Video series! Check out the other installment of this series by clicking the image below:

    Sewing Vintage Vogue V9280 video series! This series breaks down the fitting and sewing process for this 1940s piece | Vintage on Tap


    Subscribe to Vintage on Tap on YouTube!

    Thank you, McCall’s Pattern Company, for making this video series and collaboration possible!

     
    All the Places, All the Stuff!
    Never miss a post by following me on Bloglovin’!
    Or go mobile- I’m on Instagram and YouTube!

  • The Vintage Vogue V9280 Sewing Series!

    The Vintage Vogue V9280 Sewing Series!

    I’m happy to announce my new video series, collaborating with McCall’s Pattern Company!

    My continuing collaboration with McCall’s features the newest release, Vintage Vogue V9280, originally released in 1948.

    From the Vogue Patterns website:

    Close fitting dress has front princess seams, inverted pleat at center back and detachable collar and sleeve facing.

    Breaking it down, the piece is all the glamour and fashion of the late 1940s, including shoulder pads, side closure, bell sleeves, and full retro detailing all along the interior. 

    Vintage Inspired Coatdresses, inspiration for V9280 | Vintage on Tap

    Coat dresses are absolutely fabulous!

    Living between the shape and structure of a coat– and the ease and comfort of a dress, coat dresses are quintessentially vintage inspired. Kate Middleton rocks them on a regular basis and finding vintage patterns for these sorts of designs is relatively easy.

    I’ve gone ahead and collected more inspiration images over on Pinterest, if you’re looking for more examples of this sort of design.

    The main thing to consider with this sort of garment is that the fabric makes all the difference.

    This Vintage Vogue V9280 video series will break down the sewing process!

    Similarly to my McCall’s M7625 Video Series, this series will include three videos:

    1. Fitting video, breaking down potential fitting concerns
    2. Technique video, deep diving into one specific technique that applies to this pattern
    3. Sewing video, going step by step through the sewing process

    For reference, these are my measurements:

    • Bust: 41in/104cm
    • Waist: 33.5in/85cm
    • Hips: 42.5in/108cm
    • Torso Length: 15in/38cm
    • Height: 5’2?/157cm

    Please note: Not all pattern adjustments I make will be applicable to all people. However, I will be using mine throughout the process to give people an idea of potential hurdles and potential adjustments to attempt. Even if you don’t match my measurements, the video will definitely help get you in the mindset for pattern adjustments.

    Sewing Vintage Vogue V9280 video series! This series breaks down the fitting and sewing process for this 1940s piece | Vintage on Tap


    To view more from this series, please click the image below!

    How to fit Vintage Vogue 9280, a retro dress from 1948 | Vintage on Tap

    Sewing Bound Buttonholes through a facing or lining, video tutorial and walkthrough | Vintage on Tap

    How to Sew Retro Clothing - Vintage Vogue 9280 Sewing Walkthrough | Vintage on Tap


    Pin this Post!!

    Sewing Vintage Vogue V9280 video series! This series breaks down the fitting and sewing process for this 1940s piece | Vintage on Tap

    Thank you, McCall’s Pattern Company, for making this video series possible!


    All the Places, All the Stuff!
    Never miss a post by following me on Bloglovin’!
    Or go mobile- I’m on Instagram and YouTube!
    Subscribe to Vintage on Tap on YouTube!

  • How (and why!) to use Tailor’s Tacks, Video!

    How (and why!) to use Tailor’s Tacks, Video!

    How to use tailor's tacks, thread loop | Vintage on Tap

    Tailor’s Tacks might seem difficult, but I promise you, they’re amazing.

    Generally considered couture, they’re a great way to mark your fabric pieces during the sewing process.

    Tailor’s tacks carry this unfortunate stigma of being time consuming and just “ew, hand sewing”- but attention to detail counts in sewing, even down to the pattern markings. 

    Nobody wants a giant hole in their expensive fashion fabric.

    At least I THINK most people don’t want that.

    One of the most common fabric marking tools is a piercing awl, which is all well and good, except for its single purpose: piercing a hole in your beautiful fabric.

    Common places the awl might be used? Dart end points and pivot points, all areas that receive a huge amount of stress when worn. Adding an unnecessary hole to a high stress point is less than ideal.

    In the same vein, dress maker’s wheels also pierce fabric and (in general)- the less holes you pierce into your fabric the better.

    “But it’s just a tiny hole.”

    Taking the time to avoid points where fibers may become damaged over time will protect the integrity of your garment over the long haul.

    Think of your favorite pair of nylons or a yummy nylon bra. A tiny hole or snag in that will cause unraveling and before you know it, there’s a giant hole where there wasn’t one before.

    The second most common fabric marking tools are water-soluble markers.

    Water-soluble markers are great for knits and garments that will be laundered repeatedly. However, depending on the type of garment you’re making, laundering and water submersion might not be what you’re into.

    There’s a full list of fabrics that should probably avoid water and unnecessary moisture such as wools, silks, and special occasion fabrics. A pink or blue mark at a dart point is not cute, especially when you can’t wash it out.

    Tailor’s chalk might be a good option as replacement to a water soluble marker, however pattern pieces may need to be marked individually, which can also become time consuming.

    Practice your tailor’s tacks before rolling them out for a garment.

    A few practice tries on a couple scraps of fabric only take a few minutes and you’ll be using tailor’s tacks in no time!

    How and Why to Use Tailor's Tacks | Vintage on Tap

    Step One: Consider the thread and needle combination.

    Chose thread that will stand out against your fabric. Black fabric? White thread. Grey fabric? Yellow or red thread. Chose something that will be bright and easy to use instantly (no more searching for awl piercings!)

    The needle you use to create the tailor’s tacks should match the fabric you’re working with, in a similar way that your sewing machine needle matches your fashion fabric. Thin needles for delicate fabrics and chiffons, thicker needles if you’re using a denim or thick wool.

    Double your thread, but don’t knot it.

    Tailor Tacks tutorial | Vintage on Tap

    Step Two: Create your tailor’s loop.

    Push your needle through the fabric, leaving an inch to two inch tail, and pull your needle back up through your fabric to make a stitch.

    Tailor Tack's tutorial | Vintage on Tap

    Double back your needle to the starting point, again pulling your needle back up through your fabric, leaving a one inch loop.

    Snip your loop and snip the new tail, leaving an inch or two.

    How to use tailor's tacks, thread loop | Vintage on Tap

    Tailor's Tacks, what they look like | Vintage on Tap

    Step Three: Pay special care when marking multiple layers.

    When marking multiple layers, start by following the video above.

    Snip the tail and loop.

    Slowly separate the layers of fabric, evenly spacing out the threads. Snip between the fabric layers.

    Tailor's Tacks, what they look like | Vintage on Tap

    Tailor's Tacks, what they look like | Vintage on Tap

    Mishaps occasionally happen when you make a tailor’s tack.

    Tangled threads while making your loops, or even pulling the completed threads out by accident. They happen! But.

    Remarking tailor’s tacks is quick and easy and sure as hell beats piercing the sh*t out of your fabric for no reason.

    Even better, the more you practice marking your fabric in this way, the faster it’ll be.

    Tailor's Tack Tutorial, Learn how to Do Tailor's Tacks! | Vintage on Tap

     Pin this Post!!

    Learn how and why to use Tailor's Tacks in your sewing process! | Vintage on Tap

    Do you have a favorite way to mark your fabric that I haven’t mentioned? Leave it in the comments below!


    All the Places, All the Stuff!
    Never miss a post by following me on Bloglovin’!
    Or go mobile- I’m on Instagram and YouTube!
    Subscribe to Vintage on Tap on YouTube!

  • Gertie Retro Keyhole Blouse, Video Sewing Tips!

    Gertie Retro Keyhole Blouse, Video Sewing Tips!

    Gertie Keyhole Blouse, how to sew | Vintage on Tap

    Any excuse for bias binding is a good one.

    When I spied the bias binding detail along the neckline of the Gertie keyhole blouse, I knew I had to have it.

    The design, from Gertie’s New Book for Better Sewing, is a short sleeve piece with a button down back and self-drafted adjustments outlined in the book. The gathers at the shoulder are really beautiful and super flattering, and the keyhole detail gives this blouse a gorgeous 1930s and 1940s look.

    1940s Keyhole Blouse, how to sew | Vintage on Tap

    I’ve been in search of a well-fitting, multi-purpose blouse for a while.

    To be dressed up or dressed down, to be worn with a pair of blue jeans or tucked into a wool pencil skirt, a well-fitting basic can be a game changer (think of the modern t-shirt and how comfortable and classic it is.)

    Vintage-style basics can sometimes be on the plainer side- and to be honest, I’m 100% happy with it!

    Why?

    Because if you find something that works, you can make tons of it– in all types of fabrics, all types of colors, and then you’ll have a hearty wardrobe to pick from and mix and match.

    The closest I’ve gotten to it in my recent sewing experience, is my Seamwork Astoria sweater, which I’ve already made five versions of (and I could use a few more, btw.)

    1940s Keyhole Blouse, how to sew | Vintage on Tap

    Sewing the Gertie keyhole blouse is easy- but there’s a little bit of pattern drafting that has to happen before you get started.

    Fabric by My Fabric Designs | Vintage on Tap

    Getting started sewing this 40s style keyhole blouse is a piece of cake.

    Before getting started, the usual prep has to get done! Includes, but isn’t limited to:

    • Tracing the Bow Tie blouse from the New Book For Better Sewing and making your initial muslin. (Not sure how to trace nested patterns? Click here to learn how!)
    • Getting your bias binding situation sorted out, either bought or self-made.
    • Laundering and prepping your fabric

    The fabric I used was printed from MyPatternDesigns, which graciously donated this fabric for use.

    I printed this fun paisley design onto organic cotton sateen, which sewed up like a dream and laundered well. The colors did bleed slightly, but I think that’s more due to how I hung my fabric to air dry. I would recommend air drying this fabric flat.

    Gertie keyhole blouse, how to sew | Vintage on Tap

    Stay stitch neckline on Gertie Keyhole Blouse | Vintage on Tap

    Step One: Get your prelim stitches in place.

    There are a couple different stitch considerations to keep in mind when getting everything set up.

    Stay stitch the neckline and the keyhole.

    While the instructions in Gertie’s book do not mention stay stitching, I always recommend it as standard practice and just Good Sewing.

    Taking the minute or two to make sure your neckline, which is one of the most important parts of your garment, stays put can save you hassle down the road.

    After determining your appropriate stitch settings, sew a line 1/4in away from the raw edge to provide a little bit of stability.

    Gathered shoulders, rotating darts on Gertie's Keyhole blouse | Vintage on Tap

    Be super conscious of your gathering stitches and how you intend to “finish” them.

    Covered at timestamp 3:39 in the video, do a couple backtacks at normal stitch length before lengthening your stitches to basting/gathering length.

    Why?

    The backtack at normal length will become an anchor point, at which to push your gathers towards and so your gathers don’t “fall off” the threads.

    Once the gathers are gathered, tie the threads as closely possible to the stitches and then with a normal stitch length, sew a straight perpendicular line across all gather stitches, backtacking over each gathering line. This way, your gathers will stay in place and not shift around over time, at timestamp 3:51.

    Back of the Gertie keyhole blouse, lapped zipper detail | Vintage on Tap

    Gertie Keyhole Blouse pattern adjustments | Vintage on Tap

    Step Two: Sew the side seams, shoulders, and back closure

    Sewing the side seams and shoulders are pretty straight forward- but when it comes to the back closure… the sky is the limit!

    The original Bow Tie blouse featured a button placket right up the back, which looks lovely. As I discussed on Patreon, I decided that I wanted a quick and easy zipper to not have to worry about buttoning the back of my piece.

    At timestamp 5:03, I used my adjusted pattern pieces to accommodate a lapped zipper, and stitched that in place.

    1940s retro sewing, Gertie Keyhole Blouse | Vintage on Tap

    Bias binding on keyhole blouse, Gertie New Book for Better Sewing | Vintage on Tap

    Step Three: Bias the neckline… but start with the keyhole!

    There are so many different ways to stitch in bias binding- but no matter what, take your time!

    Remember that the bias bound neckline is what makes this piece, so a twisted and wonky bias strip can make things look “off.”

    The bias binding is inserted on this particular blouse at timestamp 5:23, taking care to insert the bias binding on the keyhole first. I went step by step in the following order:

    1. Pinned the bias binding in place (5:23)
    2. Sewed the first stitch line, close to the first fold on the bias tape
    3. Pinned the bias tape closed (to the inside, 5:58)
    4. Pressed the bias tape with steam to keep it from wiggling or twisting
    5. Hand sewed the bias tape closed

    Retro sewing, Gertie Keyhole blouse | Vintage on Tap

    Retro sewing, Gertie Keyhole blouse | Vintage on Tap

    All in all, the Gertie keyhole blouse is a really cute retro sewing piece.

    I love how quickly it came together (in an afternoon!) and how much fun it is to wear– I get a lot of compliments on it and I feel like the waist tapering really gives it a great silhouette.

    And I admit, I’ve worn it at least once a week since I’ve made it. There, I said it!!

    Sewing video tutorial to learn how to make the Gertie Keyhole Blouse! | Vintage on Tap

    Have you made a keyhole blouse before? What fabric would you have chosen for this piece?

    Disclaimer: This post contains affiliate links and thank you to My Fabric Designs for donating this fabric for use!


    All the Places, All the Stuff!
    Never miss a post by following me on Bloglovin’!
    Or go mobile- I’m on Instagram and YouTube!
    Subscribe to Vintage on Tap on YouTube!

  • Intro to Dart Rotation, a Quick Sewing Overview

    Intro to Dart Rotation, a Quick Sewing Overview

    When I first learned about dart rotation, my mind was blown.

    I distinctly remember my thoughts were something along the lines of…

    “…wait- I can change the pattern like that?! What?! How? THIS IS GOING TO BE HARD!”

    I’ve lived through it- survived it- and let me tell you: it’s a piece of cake.

    Intro to Dart Rotation, Sewing Overview | Vintage on Tap

    Dart rotation is a reminder that a pattern piece can be anything you want it to be, so change those darts how you see fit. 

    The “standard” sloper usually has one dart, with most patterns rocking two darts on a basic bodice.

    Of course, the amount of darts in fashion design are plenty.

    • Regular plain darts
    • French darts
    • Shoulder darts
    • Shoulder gathers
    • Dart tucks
    • Waist tucks
    • Princess seams
    • Aaaaand more!

    Full disclosure: there are still quite a lot of darts/gathers/tucks that I haven’t tried sewing yet– the concept is generally the same for all.

     Intro to Dart Rotation, dart placement lines | Vintage on Tap

    You can rotate a dart anywhere on your pattern that makes sense for you and for your design.  

    There is one general “rule” to keep in mind though. However, the more you practice dart rotation, the more you may be comfortable to break the rule down the road.

    The main rule is…

    The bust point should/must/has to end about 1in away (A, B cup)/2in+ (C cup and above) from your bust point. The larger the cup size, the further the distance your bust point should end.

    For example, if you move your dart to the shoulder, as long as the dart ends the designated distance from your bust point, you’ll be good to go.

    Note that this is less of a concern if you have to change your dart to a gather, just as I did for my vintage-style slip.

    Dart rotation on a Vintage Slip sewing pattern | @vintageontap

    After completing an FBA, the bust dart was too much of a point and wasn’t flattering. I changed the dart to a gather, “softening” the dart which made much more sense for the design and for my body. (Read more about the process over my vintage slip blog post.)

    Other examples of dart rotation and dart manipulation include…

    Vintage Vogue V8789

    Vintage sewing, Vogue V8789, dart rotation tutorial | Vintage on Tap

    For this piece, after doing a full bust adjustment, I rotated my dart to a single waist dart to keep the design intact. The waist dart now included enough fullness for my full bust.

    Vintage Butterick B6282

    Flags of the World Challenge, 1940s Vintage B6282 | Vintage on Tap

    In this vintage piece, I completed a full bust adjustment and then rotated my darts out to the shoulder and waist, to keep the integrity of the gathered 1940s style.

    Want MORE sewing tips and advice?

    Get my sewing tips, advice, tutorials, and encouragement right in your inbox!

    Powered by Kit

    Grosgrain ribbon waist stay and interior reinforcement, Vogue 8789 | Vintage on Tap

    Dart rotation and dart placement for fuller chested people requires some additional care

    As much as I wish this weren’t the case, further considerations must be taken with dart rotation if you’re rocking a C-cup or above.

    Questions to consider include…

    • Does the dart accurately point to the bust point?
    • Does the angle or shape of the dart actually cup the breast in a way that makes sense?
    • Does the placement of the new dart highlight or detract from the chest area? (Depends on how much attention you want there.)
    • Does the dart make sense as a gather?
    • Do the ladies have ample space to breathe?

    Shoulder detail, vintage 1940s B6282 | Vintage on Tap

    Not all darts are created equal and not all darts will work with your body shape.

    Don’t be intimidated by changing up the garment design to make the dart work for you and your body! I know it can be intimidating to change a design, but remember you’re (usually) working from a pattern that is made to be altered to work for you.

    As long as you’re mindful of having a nice distance between dart end point and your full bust, move your dart around as you see fit.

    Intro to Dart Rotation | Vintage on Tap

    Have you tried rotating a dart? What was the hardest part? Is there a specific dart you’re stumbling with right now?


    All the Places, All the Stuff!
    Never miss a post by following me on Bloglovin’!
    Or go mobile- I’m on Instagram and YouTube!

    Subscribe to Vintage on Tap on YouTube!

  • How Sew a Bias Facing, Video Tutorial

    How Sew a Bias Facing, Video Tutorial

    How to Sew a Bias Facing, video tutorial | Vintage on Tap

    Sewing a bias facing is simple and satisfying.

    I actually love how clean and professional the technique is and have used it on almost every type of project. Whether its an armhole or a neckline, it makes for a quick finish.

    The most common place you’ll use a bias facing is on an armhole. 

    There are definitely plenty of ways to finish an armhole, including:

    • Sewing a full facing
    • Turning the edge and then stitching in place with a straight stitch
    • Serging

    While all of the above options have some pros and cons, I think bias facings are a really nice, clean solution of finishing an edge if you’re working with a woven. Its stable and the wear and tear holds up over time.

    I also used this bias facing technique in my recent short-sleeve Simplicity 1364 which was posted recently.

    Before you begin sewing your bias facing:

    Don’t skip the prep work for your armholes, which mainly includes figuring out your seam allowance situation!

    What do I mean by seam allowance situation?

    Most seam allowances are 5/8 inch, with armholes occasionally at 3/8 inch. The width of your bias binding (or bias tape, as I describe in the video) will affect how this technique works, but it can be easily accommodated for. In my video, I used a bias binding that was 1/2 inch wide. The seam allowance, when all was said and done was a scant 3/8 inch in my video.

    How did I calculate that?

    The bias tape is 1/2 wide, folded (1 inch wide, unfolded.)

    Line #1 in the video is sewn at 1/4 inch (at the first fold.)

    The bias binding, when turned and pressed, creates a lip of roughly 1/8 inch before Line #2 is sewn in place.

    If you’d like to stick to a 5/8 seam allowance, I would recommend using a 1 inch wide piece of bias binding (2 inches wide, unfolded); Line #1 stitched at 1/2 inch. 

    How to Sew a Bias Facing, video tutorial | Vintage on Tap

    Step One

    Pin your bias binding in place, time stamp 1:20.

    If you’re using commercially purchased bias binding, unfold one edge of your bias binding and pin it to the right side of your fabric. (If you’re using a simple strip of bias tape that you’ve made yourself, you probably won’t have to unfold an edge.) Do this with right sides together.

    Please note, if you’re working on a curve, please steam your bias tape into an approximate shape of the curve it will be matching before completing Step One.

    Taking the time to press the bias binding into a curve will allow the tape to naturally curve in the direction you want it to lay, making it easier to pin and sew. I go over this step at timestamp 1:11 in the video tutorial.

    Step Two

    After pressing, sew Line #1 of stitching, time stamp 2:17.

    In the sample in the video, I stitched Line #1 at roughly 1/4 inch, which coincided with the memory fold line in the bias tape. If you’re using a wider bias tape, as noted above, Line #2 may be stitched at a different seam allowance.

    How to Sew a Bias Facing, video tutorial | Vintage on Tap

    Step Three

    Press the bias tape closed at the stitch line, and then turn under, time stamp 2:36. Turn the bias tape to the wrong side of the fabric and repin in place.

    If you’re working on a curve, you’ll need some steaming action to ease the bias tape in place. Steam like crazy, aiming to shrink the bias tape as it curves in on itself and have the bias tape lay as flat as possible.

    How to Sew a Bias Facing, video tutorial | Vintage on Tap

    Step Four

    Sew Line #2, closing the bias tape, timestamp 3:25. Make sure you sew Line #2 at a location that works for your garment and that can still close up the bias tape with no problem.

    How to Sew a Bias Facing, video tutorial | Vintage on Tap

    Overall, sewing a bias facing is straight forward.

    I didn’t discover this process until after I’d been sewing a while and only because I thought I was going to tackle something complicated. The name almost hints at it being inherently difficult, but its really not.

    Definitely take the time to make a sample on a scrap of fabric of both the straight seam and curved seams, just to get the hang of it and see if you like the technique and see it being part of your sewing arsenal!

    Hopefully this video made the process a little more straight forward to understand and easy to tackle! Taking a moment to deep dive on new techniques can really build up your knowledge and I’m all about making samples of absolutely everything, just to get better and better at what you do.

    Want MORE sewing tips and advice?

    Get my sewing tips, advice, tutorials, and encouragement right in your inbox!

    Powered by Kit

    How to Sew a Bias Facing, video tutorial | Vintage on Tap

    Do you see yourself using this technique in your future projects? Have you tried this technique before? What do you like or dislike about it?

    Disclaimer: This post contains affiliate links :)


    All the Places, All the Stuff!
    Never miss a post by following me on Bloglovin’!
    Or go mobile- I’m on Instagram and YouTube!


  • How to Use a French Curve, Video Tutorial!

    How to Use a French Curve, Video Tutorial!

    Learning how to use a French curve in your pattern drafting is important.

    So important, that I would wager to say that besides my straight edge grided ruler and mechanical pencil, I would honestly flip my sh*t if my French curve went missing. Ever since I learned about it at university, its super high on my list for top sewing tools; there is not a single project that my French curve is not integral to success.

    The types of French curves on the market are numerous.

    If you’re searching Amazon, I can definitely see how they might be intimidating to even think about!

    The two in their listings that I would recommend are:

    • Fairgate Vary Form Curve
      • Pros: This is essentially the one I use (haha!), sturdy, can use it with my rotary blade
      • Cons: Not transparent
    • Dritz Styling Design Ruler
      • Pros: Love the gridded section, love the straight edge component, transparent
      • Cons: Plastic may snap or be ruined by cutting implements, not a dual sided curve, looks kind of flimsy for long term use

    How to use a French Curve | Vintage on Tap

    With so many French curves out in the market, you can use most of them in your pattern drafting. When choosing one, please just consider the following questions:

    • What are you primarily going to use it for? If for strictly pattern drafting, you’d be ok with a plastic ruler, but if you want to also be able to cut with it, stick to a metal ruler.
    • How are you planning on storing it? If hanging, make sure it has a hole in the body to hang from.
    • Is this going to be your single French curve? If so, look for a long French curve with a sharper curve at the head that can serve double duty. If you’re able to afford and have space for multiple tools, you can purchase sharper curved pieces separately and instead aim for a more traditional French curve with more gentle, natural curves.

    The length of this sewing tool is super important.

    Please, aim for a larger French curve that will be adequate for the length between your bust line to hip line– you may have to use this curve to blend that distance.

    How to use a French Curve, blending curves in armhole | Vintage on Tap

    How to Use a French Curve Tip #1: Blending jagged edges, like armholes after a full bust adjustment.

    I discuss this particular tip at the 30 second timestamp.

    The first consideration for this step is that you’re essentially looking for the median of the jagged edge: a line that blends as many of the points together into a smooth, curve that would feel natural against the body.

    1. Identify the areas that need to be blended and decide what type of curve it needs– convex, concave, S-shape, etc.
    2. Identify which part of the ruler will hit the right median between the points.
    3. Move the ruler around in order to capture different parts of the curve as needed. For example, if you’re working on an armscythe you might need one portion of the french curve versus if you’re blending the waist of a dress, you might need to reference 4+ edges of the ruler!

    The main take away of this step, is that when you’re learning how to use a French curve, you can really make that new line do whatever you want it to do. 

    Even a change in a curve of 1/4in makes a difference. If an armhole is too tight, you can change that curve as needed. If a pencil skirt is too straight, you can give it a little more va-va-voom.

    Experiment with the different parts of the ruler for the best curve for the part of the garment you’re working on, but don’t forget to walk your pattern seams after doing this step, just to make sure everything lines up!

    How to use a French Curve, blending pattern pieces | Vintage on Tap

    How to Use a French Curve Tip #2: Blending between pattern pieces.

    In my example at timestamp 1:45, I blend between the front and back pieces that aren’t matching at the side seam.

    This will apply in so many different situations:

    • Blending the shoulder seams
    • Blending a bodice to a skirt
    • Blending a sleeve head
    • Blending skirt pieces to one another

    The concept is pretty simple, though! If you’re walking a seam, and see that no matter what you do, your pattern pieces are not walking properly (bodice is too long compared to the back, etc.)– identify which pattern piece needs to be blended to its corresponding seam.

    In practice, the steps are straight forward:

    1. Walk pattern pieces and calculate how much more needs to be added or subtracted from the “off” piece
    2. Walk pattern until the relevant seam is sitting as it will ultimately be finished (for example, if you’re working on a princess seam, walk the pattern from the top edge, down the curve, to the waist seam.)
    3. Complete steps as outlined in the video, using the French curve to redraft the seam into a smooth curve
    4. Rewalk the seam to confirm that the new seam is meeting correctly (in the above example, rewalk the seam from both the top edge AND the bottom edge of the princess seam, to make sure BOTH seam ends match up and are smooth)

    How to use a French Curve, blending pattern pieces | Vintage on Tap

    Completing the above process will make a brand new cut line, so be sure to only add on the appropriate amount for the seams to match. 

    If you’re making a bodice for a dress, doing this step on the side seam means that you’ll have to rewalk the bodice pieces to the skirt to make sure THOSE seams match properly.

    Ultimately, this is where the “drafting” in “pattern drafting” is at its full, 100% effect. You are essentially using your French ruler to mold a pattern to your body and make sure a piece of paper is translating your natural curves. Its a combination of sewing and geometry, down to the 1/4 inch.

    How to Use a French Curve on Darts | Vintage on Tap

    How to Use a French Curve Tip #2: Trueing a dart.

    Or “truing” a dart- same thing. This step is covered at 3:56 in the video.

    Essentially in this step, you’re making sure that any changes to a dart are accommodated for by making sure there is enough fabric at the bottom of the dart to fit within the seam allowance.

    While this might be tricky to conceptualize, if you think back on a dart you may have had to a change on- whether its a full bust adjustment, a small bust adjustment, or even just a movement of the dart, you need to make sure that when the dart is closed, that the dart seam allowance fits neatly within the final seamline.

    To get this step done, complete the following steps:

    1. Close the dart in the direction of where the dart will be pressed
    2. Identify the seam that needs to be blended
    3. Draw the new blended line using the appropriate section of the French curve. You can also use a tracing wheel for this step. Please no more than 2- max 3- passes of the tracing wheel (too many passes and the line gets “blurry” to follow)
    4. Open up the dart and complete the new dart redraw. If you used a tracing wheel, use the French curve to connect the dots of the tracing.

    Please note- the above steps are for MOST darts, whether a side seam dart, a waist dart, skirt dart, whatever. At the very least, close the dart and make sure you have a smooth seamline just to confirm that your dart will sit properly when you move onto the fabric.

    How to Use a French Curve on Darts | Vintage on Tap

    Learning how to use a french curve can really elevate your sewing experience like crazy.

    For such a simple and relatively cheap tool, it can make for better drafting overall and for better understanding of how pieces fit together.

    As I cover in my Walking a Pattern video, a 1/4in here and there can add up into garments that don’t fit. By using a combination of walking seams and French curve, you can remove some of those obstacles that can make it difficult to fit clothing to the body.


    I hope you found the tutorial useful!

    As I said in the video, I receive lots of questions about this tool because I use it so extensively in my pattern drafting tutorials. The playlist for pattern drafting tutorials has grown like crazy at this point- and I think at this point the French curve has made in appearance in at least 50% of them!

    Want MORE sewing tips and advice?

    Get my sewing tips, advice, tutorials, and encouragement right in your inbox!

    Powered by Kit


    How to use a French Curve, tutorial | Vintage on Tap


    Have you learned how to use a French curve before? Are there any other ways that you use this tool? If you haven’t used one before, why not? How can this sewing tool help your pattern drafting?


    Disclaimer: This post contains affiliate links :)


    All the Places, All the Stuff!

    Never miss a post by following me on Bloglovin’!
    Or go mobile- I’m on Instagram and YouTube!

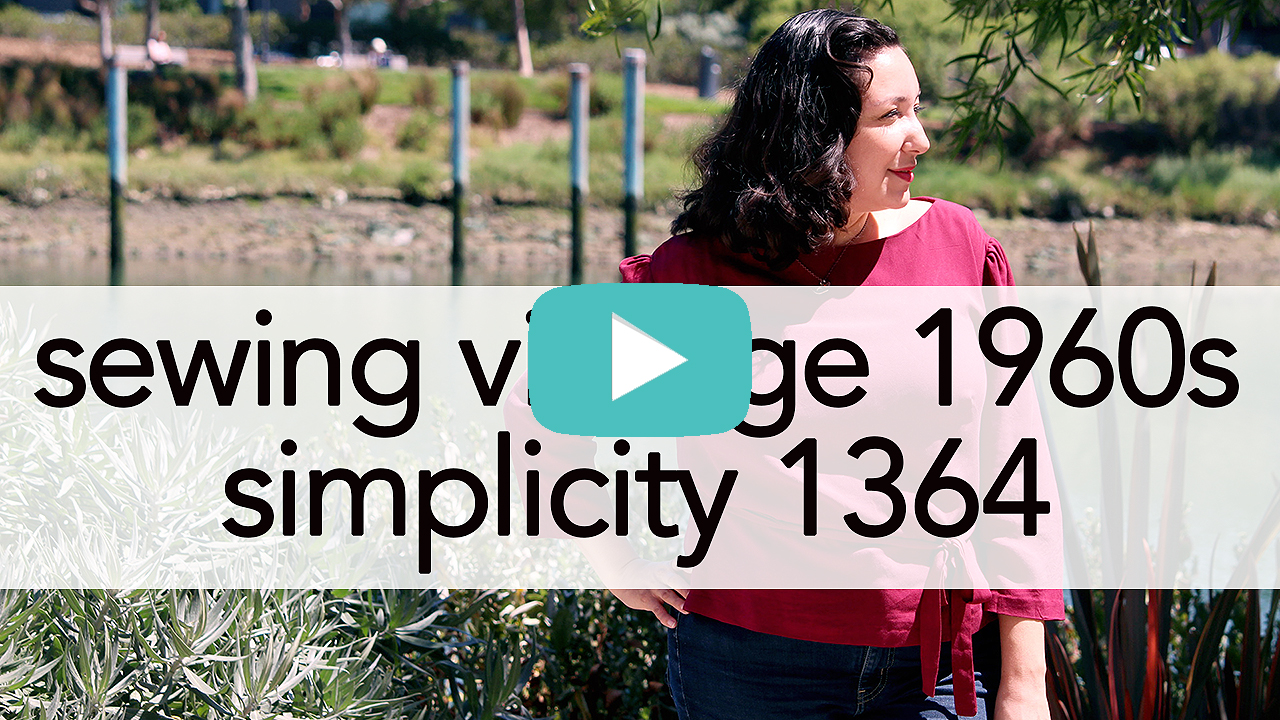
  • How to Sew Simplicity 1364, Video Tutorial!

    How to Sew Simplicity 1364, Video Tutorial!

    Simplicity 1364, How to Sew Video | Vintage on Tap

    The difference between View A and View B of Simplicity 1364 might look slight, but the styles behave very differently in fabric.

    To be quite honest, I have mixed feelings about this top.

    If you’re embarking on sewing this blouse, I have to be honest about all these conflicting thoughts. On one hand, I think its quite a comfortable, easy sew. On the other hand, the long sleeve version left a lot to be desired.

    If I were to make this again, I would stick to the sleeveless version (View B.)

    How to Sew Simplicity 1364 video tutorial | Vintage on Tap

    The problem with Simplicity 1364 came down to one thing:  the 1960s cut just didn’t agree with me.

    If you had the opportunity to watch my fitting video about this blouse, everything seemed to be going fine.

    After doing some pattern drafting magic, I was able to get a nice and comfortable, wearable fit on the bodice.

    I loved how it looked and felt on me. Even the slightly too-open neck on me was passable. Heck, I thought the slightly-off-shoulder shoulder line was just “part of the style.”

    The long sleeve version, though, was a reminder the placement of a seamline can sometimes make or break a pattern for my frame- and as you can see in the images, the off-the-shoulder sleeve wasn’t particularly flattering on me.

    My shoulder peak is literally at the edge of the facing. And you can tell.

    Add to that, but the weight of the sleeve pulls the shoulder seam down even further. I created mutton sleeves without meaning to.

    Simplicity 1364, Neckline and shoulder | Vintage on Tap

    I would still sew the View B version of Simplicity 1364 again.

    Closing in the neckline (covered in a previous post) is a simple drafting fix and the blouse is super versatile.

    The long sleeve version, probably avoiding unless I wanted to put in more time into pattern drafting.

    1960s Vintage Simplicity 1364 | Vintage on Tap

    If you’re tackling vintage Simplicity 1364, head my warnings above, but otherwise carry on!

    Realistically speaking, the top is a comfortable beginner pattern. But, there’s room for opportunity for improvement on it, if you want to take it there.

    How to Sew Simplicity 1364 video tutorial | Vintage on Tap

    Step One: Bodice Darts.

    If you had to do an insane FBA as I did, you may need to trim your darts after sewing and pressing. I used a rayon challis in my maroon version, and decided to leave about 5/8in seam allowance on that trim.


    1960s Vintage Simplicity 1364 | Vintage on Tap

    Step Two: Sleeve darts.

    Darts! On sleeves! How fun is that?

    You don’t often see darts on sleeves unless they’re on a sloper, but I love the small detail. Be sure to press the darts in the correct direction. Pressed down and you have a comfortable fitting sleeve. Pressed up and it  can rub against your elbow annoyingly as you move.

    How to Sew Simplicity 1364 video tutorial | Vintage on Tap

    Step Three: Finish with luxe details

    I opted for the following “upgrades” because I love being Extra about my sewing. I hand hemmed my blouse, and whipped stitched all my seam allowances.

    Also, if you have more of a curvy figure, I would definitely recommend making the waist tie– it really helps avoid the “sack” look.


    Like my tips and sewing tutorial videos? I put out new content twice a week. Get a weekly email from me, talking about nothing but sewing and recommending tutorials for your work!

    Want MORE sewing tips and advice?

    Get my sewing tips, advice, tutorials, and encouragement right in your inbox!

    Powered by Kit


    How to Sew Vintage Simplicity 1364 | Vintage on Tap

    Have you considered making this blouse? Do you like the off-the-shoulder seamline? Would you adjust it, like I’m planning on doing?


    All the Places, All the Stuff!
    Never miss a post by following me on Bloglovin’!
    Or go mobile- I’m on Instagram and YouTube!


  • How (and Why!) to Set Up a Fabric Swatch Book!

    How (and Why!) to Set Up a Fabric Swatch Book!

    Fabric Swatch Book, Free Download | Vintage on Tap

    A fabric swatch book? What the heck is that?

    I’ll just say it up front: my fabric swatch book is one of the most important tools in my sewing arsenal.

    The swatch book has never before appeared in a single video, but I consult it regularly and it lives next to my giant sewing pattern library. Its invaluable. If I ever have a fabric question, its there for me.

    A fabric swatch book is a book of possibilities.

    Setting up my book was one of the very first projects I did as a textile design student and it taught me a few really important things:

    1. Fabric names and fiber contents
    2. Weaves and characteristics of each type of fabric
    3. Suitable end uses

    Of course, this sort of education for a home seamstress and sewist may only come from a fabric mishap and can be a painful experience. For someone who may not know what is out there, they might not know of everything they could work with. Especially if you live in an area where really high quality fabric stores are not available, not being exposed to different fabrics and understanding how they differ can really set you back in growing as a seamstress.

    Fabric Swatch Book, Free Download | Vintage on Tap

    Online fabric stores can be a game changer, but you have to know where to start.

    I’m sure there is a percentage of people who order fabric online because they expect one thing… but get something else.

    Fiber content and qualities are described as accurately as possible, but if you’ve never been exposed to Georgette, you will have no idea what it is you’re ordering.

    Enter, swatches.

    I am a huge fan of ordering swatches, specifically ordering swatches in bulk. A swatch will tell you more than color of a textile- but it’ll show you the weave, the drape, the amount of body, the color vibrancy. It’ll give you the ability to test color fastness, laundering qualities, and how much your fabric shrinks.

    Usually priced relatively cheaply ($1-$2 a swatch), I recommend picking up 3-4 swatches every online order to start building your book.

    Fabric Swatch Book, Free Download | Vintage on Tap

    Building your Fabric Swatch book is SUPER easy.

    Gather up your materials!

    Use the free printable!

    FREE Fabric Swatch Printable!

    Get this FREE printable swatch sheet in your inbox!

    Powered by Kit

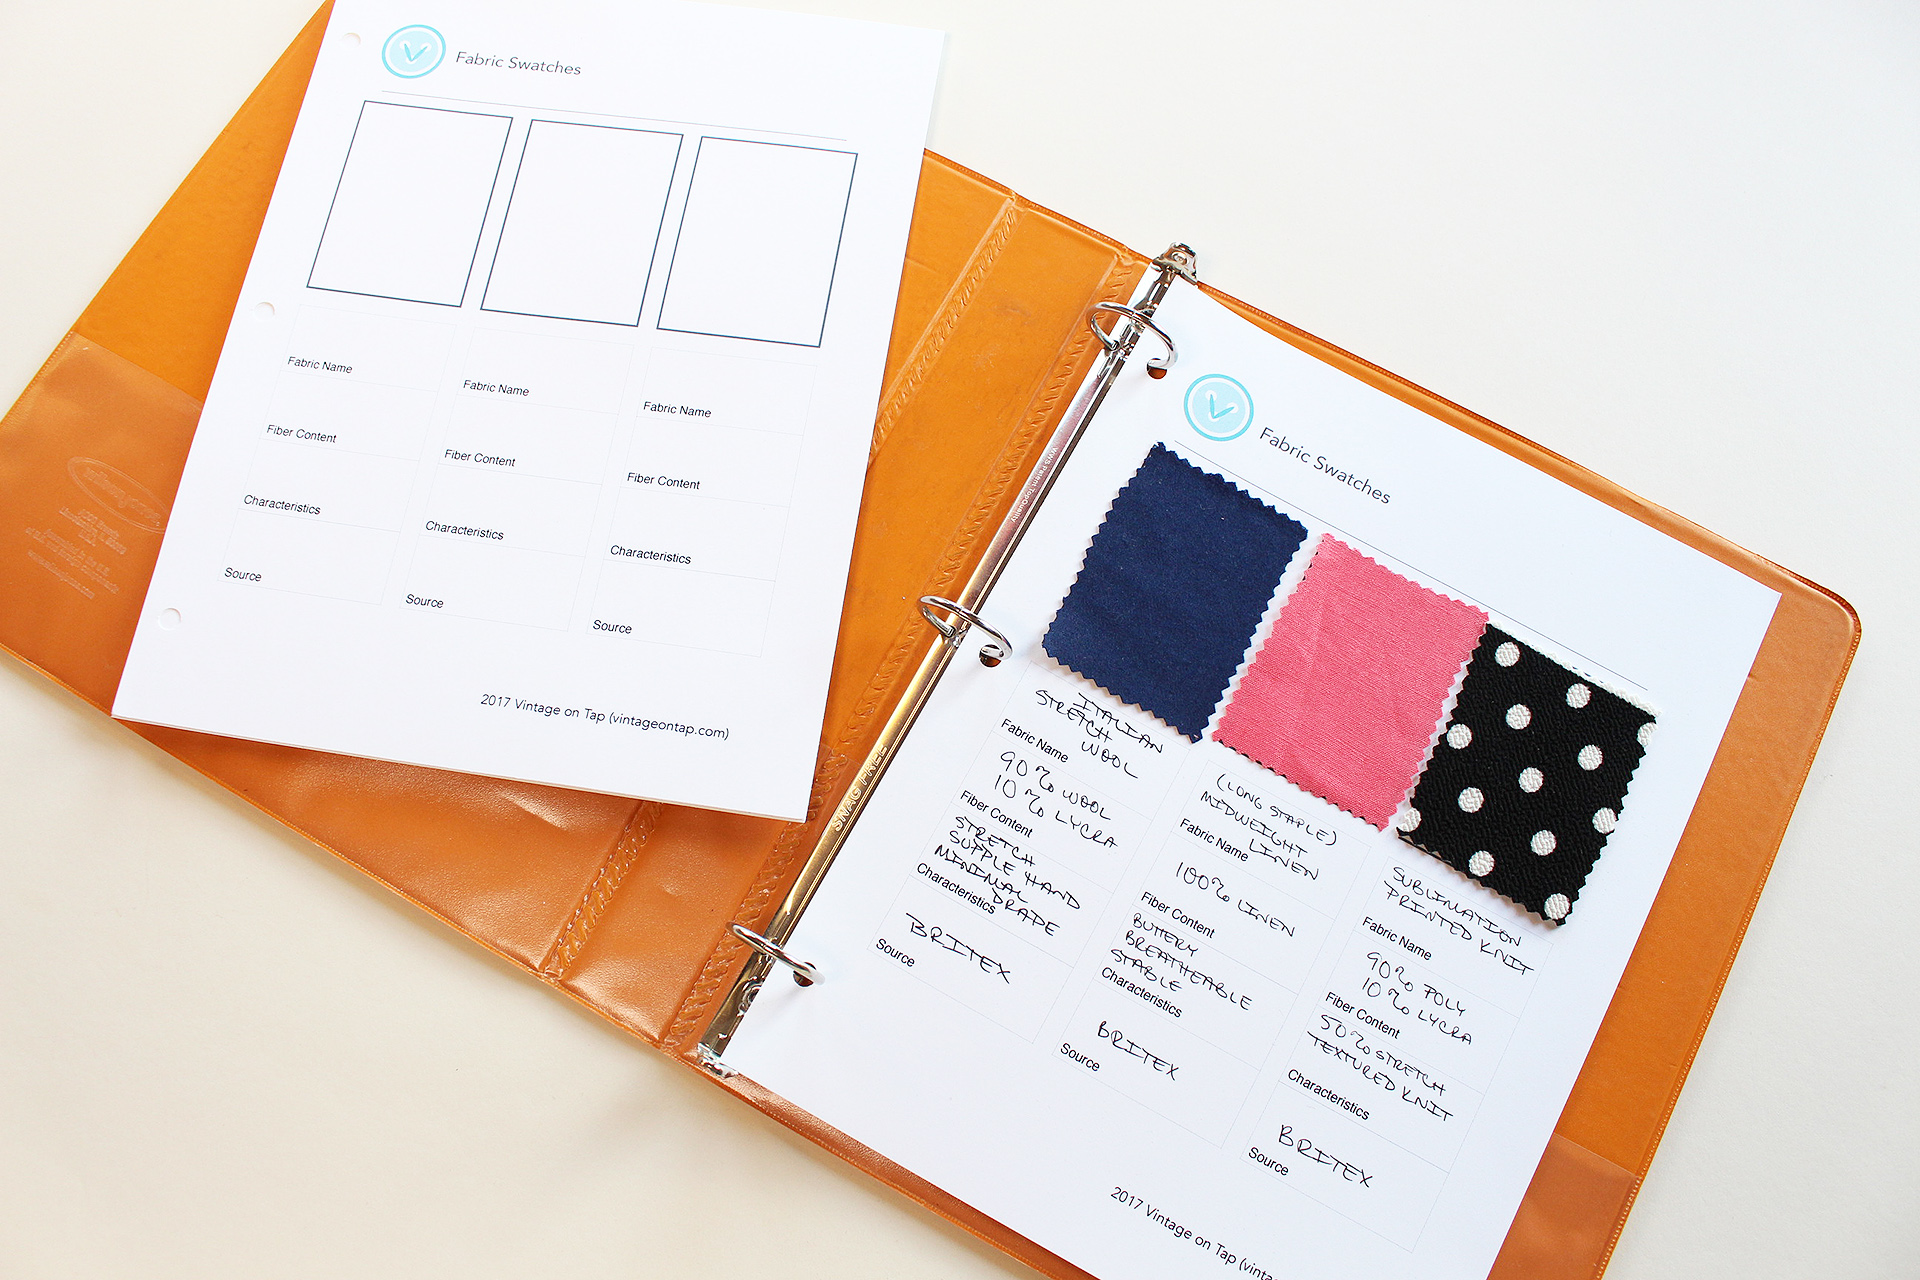
    My free printable is organized with what is most important to me in a swatch, specifically:

    • Fabric name
    • Fiber content
    • Characteristics
    • Source

    The download includes three pages, the first as pictured above, the second page reverses the position of the swatch boxes (for an evenly balanced binder!), and the third includes blank boxes in case you want to track different information than what I use personally.

    If you love working with nothing but natural fibers, you might want a box that talks about shrinkage. If you want to have pages dedicated to a specific fabric company, you might want to include a box that talks about release date or collection.

    Ultimately, build your swatch book in the way that might work best for you.

    Fabric Swatch Book, Free Download | Vintage on Tap

    Step One: Ordering Swatches

    Every time you place a fabric order online, order swatches. Every.time.

    Swatches are cheap and you should really aim to start collecting swatches from fabric you’ve never used before.

    Scuba knit? Double knit? Broadcloth? By ordering a few at a time, you start to build an array to add to your book. Also, if you’re seeing the same types of fabrics listed as recommended fabrics in your favorite sewing patterns, order them, too.

    Another tip I recommend is that if you see a free swatch sample available, jump on it! For services like Spoonflower and My Fabric Designs, new fabric types become available regularly and swatches are usually distributed for promotional purposes. Put in an order and add it to the book.

    Step Two: Build the Book

    This is pretty straight forward, but please note a few things as you get started:

    1. Please use cardstock or thicker paper for this project. Regular paper is too flimsy for heavy use.
    2. You can print your sheets double sided! This way, you don’t waste paper and you can get more swatches into your binder.
    3. Decide early on how you want to organize your book. Do you want everything organized by source location? By color? By fiber content? This doesn’t have to be a strict choice, but it’ll help you organize things and find things later down the road when all like-swatches are near each other.
    4. 3M Double-sided permanent tape might not seem like it’ll hold: but it’ll hold (I promise!) My original university book still has its swatches firmly in place, even after 6 years!

    Follow along with the video, and get your book set up. And then, flip through and admire it!

    Step Three: Use the Swatch Book Regularly + Add to the Book

    This is where the book and its uses really shine!

    Picture this: you’re about to work on a brand new pattern and the recommended fabric is a satin charmeuse. You’ve never used satin charmeuse. But. You happen to remember ordering a swatch of that a while back- so you go and consult the swatch book. Now, you know what you’re getting into.

    Or, you’re in a fabric store and absolutely NOTHING is labeled. But, you touch the fabrics in store, consult your book, and now know that you’re buying 3 yards of organza and what sort of sewing needles you should be using with it.

    The uses in this vein will go on and on. A pattern might say to use a “silky type”- and you can flip through, find all your silky fabrics, and decide right away which one of them you’re going to use. Or, you might go into a department store and try on a top where you love the fabric- you can later consult your book to find out what they used so you can replicate it from home.

    Adding to the book is a piece of cake.

    Besides ordering the swatches as above, you’ll also want to add swatches of the projects you’re working on as you try new fabrics out.

    As I said in my video, not all Italian stretch wool fabrics are going to be the same and documenting the differences are going to hone your sewing and textile discerning skills. Not all tana lawns are the same, not all midweight cotton knits are the same, etc. etc.

    Building a catalog of the fabrics you’ve worked with- in addition to the swatches you’ve ordered, will make the book more robust and you’ll become stronger at recognizing the differences.

    Ultimately, getting this fabric swatch book set up will allow you to expand your fabric knowledge and be able to more accurately select the perfect fabric for your project.

    Fabric Swatch Book, Tutorial | Vintage on Tap

    Do you have a fabric swatch book? What sorts of fabrics would you want to include right away?

    Disclaimer: This post contains affiliate links :)

     
    All the Places, All the Stuff!
    Never miss a post by following me on Bloglovin’!
    Or go mobile- I’m on Instagram and YouTube

  • Full Bust Adjustment + Fitting Simplicity 1364 How To!

    Full Bust Adjustment + Fitting Simplicity 1364 How To!

    Fitting and Full Bust Adjustment, Fitting Simplicity 1364 | Vintage on Tap

    Fitting Simplicity 1364 is simple, but the dart can be ridiculous.

    As you can see in the above image, the french dart on this bodice is insane, but sometimes a big bust just needs a big dart.

    For this blouse, I did a full bust adjustment of two inches. 

    The two inches is pretty normal for me, so I expected this much of a dart increase (especially since there was no additional dart to balance the fullness out.)

    Fitting and Full Bust Adjustment, Fitting Simplicity 1364 | Vintage on Tap

    If you’re experiencing weight fluctuation, this top might be for you.

    I was recently asked in the comments section of one of my previous videos, Weight and Sewing Self Esteem, if I had any recommendations for people who are currently moving a little bit around in their measurements.

    Simplicity 1364 is pretty versatile and I definitely recommend it as a comfortable, wearable, flattering top. 

    Specifically the tank top version. The long sleeve version will be discussed more at length in my next sewing video!

    Fitting and Full Bust Adjustment, Simplicity 1364 | Vintage on Tap

    Getting started with fitting Simplicity 1364.

    You will need the items below or their equivalents:

    Step One: Shorten (or lengthen) the bodice + Swayback

    In my case, I shortened my bodice about 1.25in because I’m suuuper short with no torso. You can observe the length of the bodice at timestamp 46 seconds in the video.

    Also, I went ahead and took care of the swayback at this point because it would just be easier, with a .5inch swayback at timestamp 1:49.

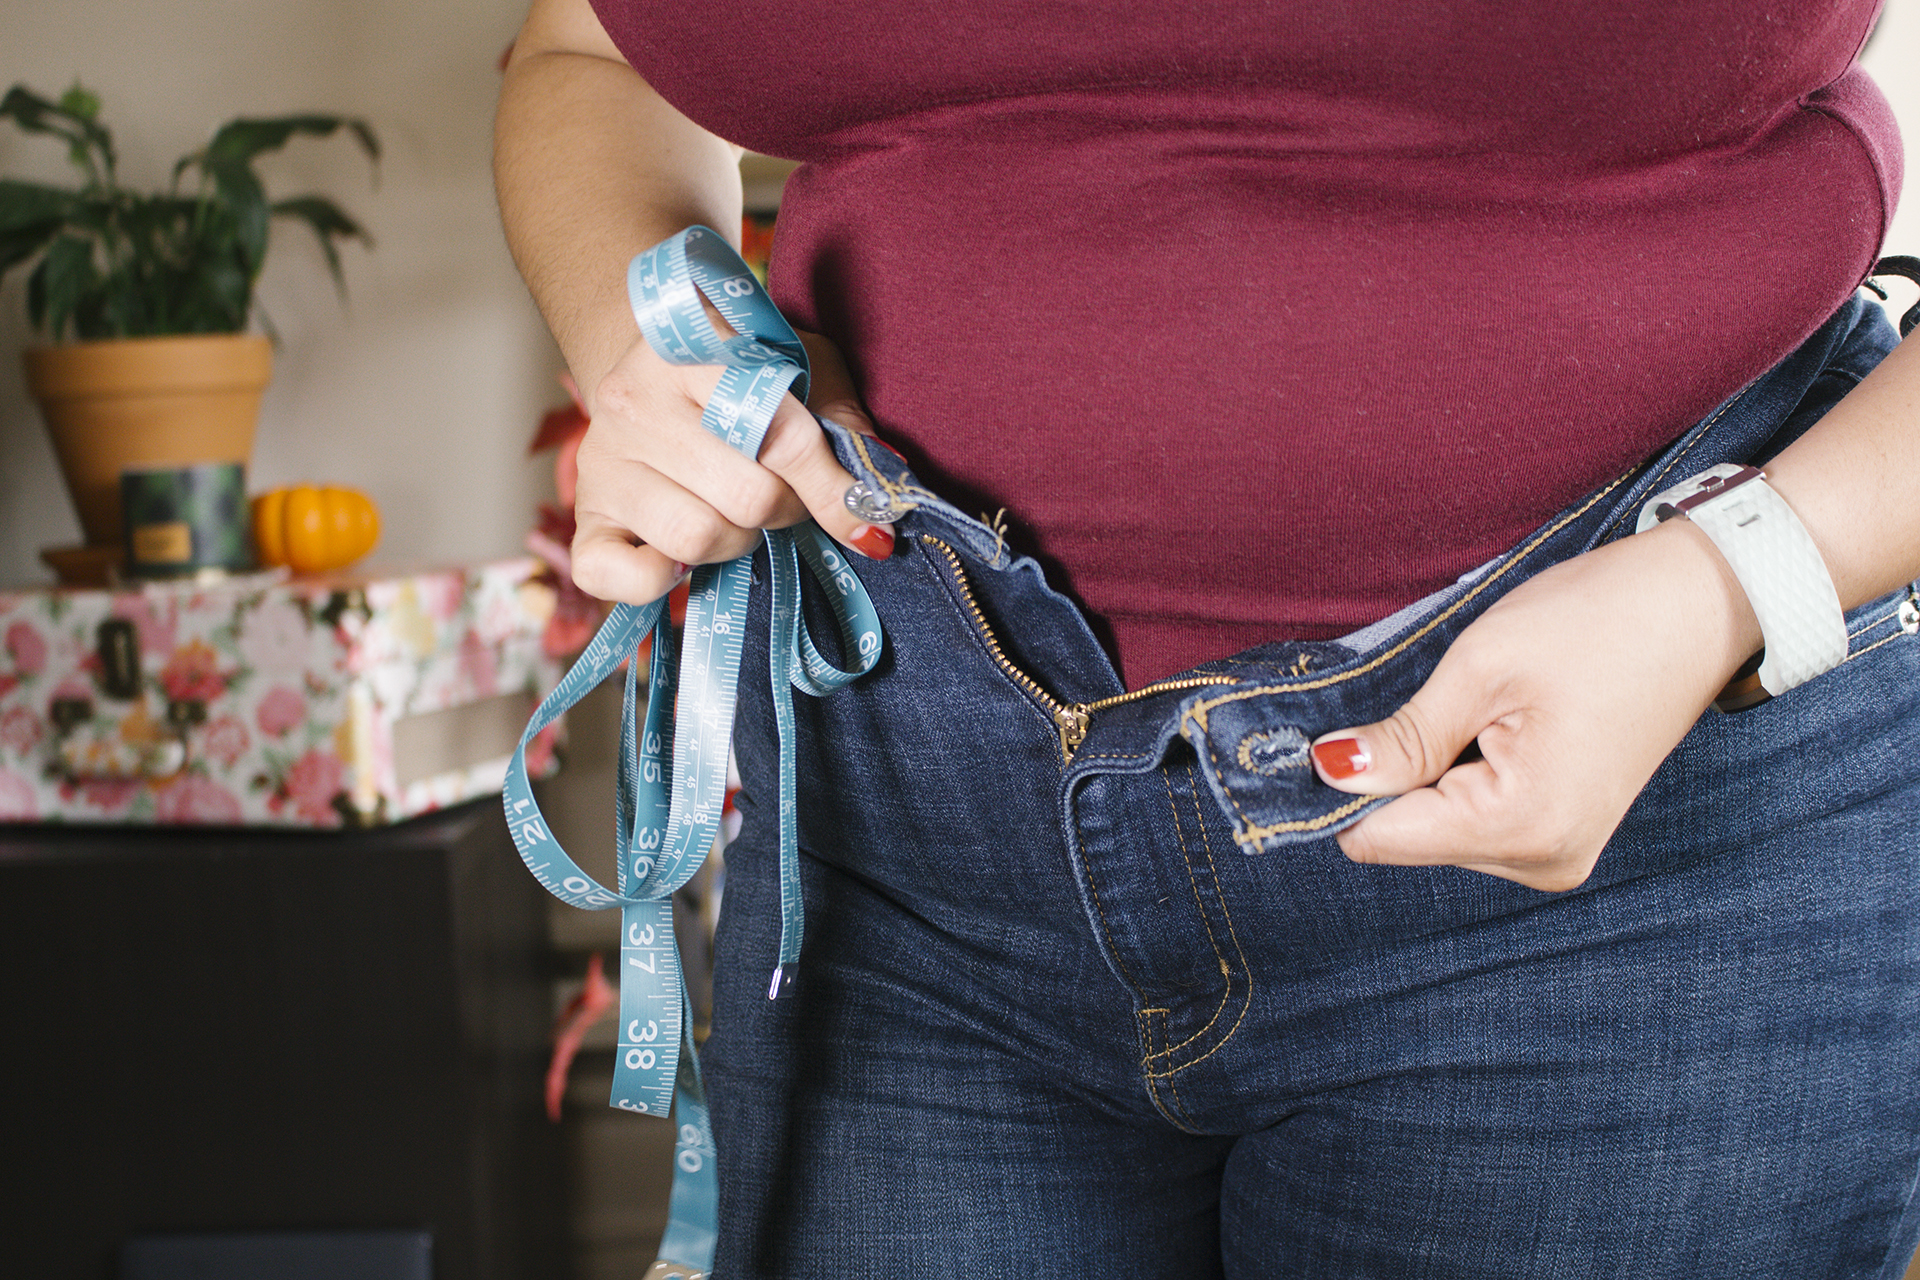
    Step Two: The Full Bust Adjustment

    As in my previous videos, I measured the distance between center front of the bodice and the center of my actual body, timestamp 2:43, to determine how much I would need to adjust for.

    The whole adjustment is covered at minute 2:52, however, as noted above the dart will be humongous if you have to do as much of an adjustment as I do. 

    Why is this important?

    Side darts normally finish cleanly into the side seam. If you have to do as drastic of an adjustment as I did (2in adjustment)- your dart might stretch into the bottom seam.

    There are a few things to consider at this point.

    1. Does your dart need to be rotated? After finishing the FBA, do a full bodice muslin to double check that the darts are landing at 1-2in from your bust point if you’re rocking a C-to-above. If the dart is pointing in the wrong place, you will need to rotate it, which may include rotating it off the waist seam.
    2. Are you sewing your dart with a slight curve, to complete a French Dart?
    3. If the dart looks ok, that’s fine! After sewing the dart, trim it so no extra fabric goes into the bottom seam. I decided to do this for this Simplicity 1364.

    Fitting and Full Bust Adjustment, Simplicity 1364 | Vintage on Tap

    I originally posted this fitting Simplicity 1364 video before publishing this post.

    Right away I got questions about things I didn’t cover in the video, so I’ve snapped a few pictures with additional tips down below. The questions focused primarily on fixing the shoulder and fixing the arm scythe, which are an easy, quick fix! And also are just a good excuse to pull out your french curve!

    Fitting and Full Bust Adjustment, Simplicity 1364 | Vintage on Tap

    Adjusting the shoulders

    The first thing you have to remember is that if you adjust the shoulders on this pattern, you will need to adjust the facing pieces to match. Please review my redrafting facings tutorial video to see how to transfer your chances over.

    In the above example sketch, I decided to move the shoulder closed about an inch, to close up the neck a little bit.

    Lines 1, 2, and 3 are variations on how you can blend that adjustment to the neckline, depending on the look you’re going for. When adjusting the shoulders on a blouse like this, you will be changing the style line at the neck just a touch, so please note that as you decide how much to bring in the shoulder.

    Notice line 3. Line 3 blends roughly one inch away from the center front seam, which is cut on fold with this pattern. You want to make sure that you leave about an inch or so of the regular neckline, just to make sure the center of your neckline looks smooth, with no interruption or abrupt weird curves.

    Fitting and Full Bust Adjustment, Simplicity 1364 | Vintage on Tap

    The arm scythe area definitely needs a little bit of blending.

    Please note: The arm scythe adjustments in this tutorial are for View C, without the sleeves attached. If you’re working on View A, measure the armhole size, and adjust the sleeve piece accordingly.

    The black pencil line is the curve after completing the FBA, where you can see that the curve is all jagged and weird. Depending on how much of an adjustment you had to complete, this area might be all choppy and weird.

    Use your French Curve to find a smooth transition along the sharpest area of change (line 1.) And then, if your bra is still peaking out slightly, you can add extra width to that area to make sure everything is covered as you find most comfortable.

    Fitting and Full Bust Adjustment, Simplicity 1364 | Vintage on Tap

    I hope you found this tutorial on fitting Simplicity 1364 useful to your project!

    Are you thinking of making this blouse? Do you want to make the short sleeve or long sleeve version? Do you have any other questions about fitting Simplicity 1364?

    Disclaimer: This post contains affiliate links :)


    All the Places, All the Stuff!
    Never miss a post by following me on Bloglovin’!
    Or go mobile- I’m on Instagram and YouTube
  • Vlog: Weight and Sewing Self Esteem

    Vlog: Weight and Sewing Self Esteem

    At this point, I’ve hit on weight and sewing self esteem three times already.

    This time, I figured it was time for an intimate conversation about my feelings in video. (My previous posts about this topic can be found here)

    Talking about weight loss and weight gain in relation to your hobby and craft is really something that can be dissected into a million different pieces.

    Where to start?

    What to cover?

    How deep to dive in?

    How am *I* even handling it?

    The topic is huge and there have been a million books written about weight loss (and gain.) Likewise, there are a million books written about self esteem and self worth. Bringing the two together into a positive learning opportunity, though?

    For the purposes of this sewing blog post, I define Sewing Self Esteem as how you view the clothes you make through your craft and love of sewing– how you perceive the fit, how you perceive how they are worn through your lifestyle. 

    Vintage Simplicity 1460 peplum blouse, sipping away at a cocktail and enjoying a day off | @vintageontap

    The only person I can speak for is myself.

    As I say in a disclaimer in the video, I’m only comfortable to speak for myself about this topic. I only speak from my experiences and from how I perceive my weight loss and how that’s hitting me in relation to my craft. Of course, I want to be mindful not to offend anyone or say anything that is perceived as nasty or out of line– but I can only speak for my journey and the path.

    My Weight Sewing Self Esteem took a hit when nothing in my closet fit.

    Essentially it came down to this:

    I spent hours and hours on a piece- time, effort, money. But, its either too big or too small. And not just by a little bit. But a lot.

    Sitting at the Legion of Honor in San Francisco, Colette Rue Dress | @vintageontap

    Even though I felt fantastic about myself as a person- confident in my body, I felt very physically ill.

    And this is really the kicker.

    Loving myself and my body didn’t make the physical health feel any better. I couldn’t sleep, was always tired, and had (still do!) high blood pressure. But the weight I had gained didn’t stop me from wanting to explore my sewing craft- to perfect my skills as a seamstress- and to keep working on what I loved.

    Ultimately, I refused to let myself take a Sewing Self Esteem hit.

    Every time we sew, we have an opportunity to learn, to grow, to explore sewing. As our weight fluctuates (and it probably will)– rather than feeling sad about the change, its a moment to reflect on how amazing our bodies are and how awesome it is that we get to dress them up however we want.

    My takeaway from my experience is… fabric comes and goes. Understanding that and understanding that our weight on the scale and size on the measuring tape do not define who we are- let alone who we are as seamstresses and dressmakers is VITAL.

    Never let your weight stop you from sewing. Even if in 6 months your measurements change, that change won’t take away the practice, time, care, and skills you learned from the experience of making. And as seamstresses, we get to savor that like no one else does.

    Sewing for the Retro Tiki Collab, Butterick B6354 | @vintageontap

    Are you experiencing weight fluctuations? Has that stopped you from sewing? Why?


    All the Places, All the Stuff!
    Never miss a post by following me on Bloglovin’!
    Or go mobile- I’m on Instagram and YouTube!
  • Seamwork Magazine Astoria Sweater, Tips for Busty Ladies

    Seamwork Magazine Astoria Sweater, Tips for Busty Ladies

    Seamwork Magazine Astoria Sweater | Vintage on Tap

    The Astoria Sweater was a joy to sew.

    I honestly loved how quickly the Astoria sweater came together and how it fit me so comfortably, but there are definitely things busty ladies need to know if they’re taking on this project.

    This is especially true if you’re into pinup style and vintage sewing: you’re going to want a specific fit and silhouette from this sweater.

    Astoria sweater by Seamwork Magazine introduction | @vintageontap

    It has been about a year since I made this Seamwork Magazine pattern.

    In the past year, I admit it: I rode this sweater hard. It’s been thrown around, washed to heck and back, but would I make it again? Absolutely. Its on my to-do list in a black double knit, a thinner white knit, and maybe a coral textured knit, just for fun.

    Seamwork Magazine Astoria Sweater | Vintage on Tap

    Would I do things differently in the next iteration of this Astoria sweater? Damn right I would.

    So let’s get down to my tips for this gorgeous piece (including my tips for the pinup girls out there who tend to be a little bit more busty)– all in the name of having you avoid the mistakes I made!

    Seamwork Magazine Astoria Sweater | Vintage on Tap

    Tip #1: Don’t skip out on the Full Bust Adjustment (FBA)

    Yes, you read that correctly. This Seamwork pattern is billed as a quick-sew, with 5 pieces (front, back, collar, sleeve, and waistband)– but if you’re like me and have anything larger than a C-cup, there will be pulling from the sleeve to your full bust point.

    You can see in the above images, that while the sweater fits, it was awkward. I thought I wouldn’t care. One year later, and it was still awkward and I cared.

    Seamwork Magazine Astoria Sweater, full bust adjustment tips | Vintage on Tap

    Luckily, I’ve made a video specifically about this topic and covering this very garment

    Due to such a huge demand in fitting videos, I figured it was time to tackle the no dart full bust adjustment and just do the necessary changes! Full written out tips for this process are covered on the blog post dedicated to this particular full bust adjustment.

    Read The No-Dart Full Bust Adjustment Tutorial!

    Seamwork Magazine Astoria Sweater | Vintage on Tap

    Tip #2: The Astoria Seamwork sweater is cropped. And I mean VERY cropped.

    If you’ve had the opportunity to see any of my pattern drafting videos, you know that I’m short (5’2”) and have a short torso.

    This sweater barely went to my waist, being this awkward “in between” length that didn’t sit right over jeans, but was also too short to tuck into skirts. For a vintage girl like myself, tucking a sweater in is vital to “the look” and I would gladly lengthen this sweater by at least 1.5in/3.8cm.

    Seamwork Magazine Astoria Sweater, full bust adjustment tips | Vintage on Tap

    Tip #3: Baste the side seams before sewing them together, to double check the silhouette.

    The photos of people’s projects for the Seamwork Astoria can be pretty hit-or-miss with the silhouette. For some people, it fit snug and a beautiful hourglass shape was created. For others (including myself)- I ended up looking like a sack.

    Shortly after the photoshoot, I did a hack-job on the waistband and tapered in the waist of my Astoria sweater by 3/4in/2cm on each side, which made it wearable, but not the standard I strive for in my sewing.

    Please take the time to baste the side seams before you commit to the silhouette, especially if you’re into pinup sewing.

    Astoria sweater by Seamwork Magazine introduction, back view | @vintageontap

    As I wrote at the beginning of the post, I’m definitely looking forward to giving this sweater some redemption, by looking at it with new eyes and new fabric. Especially here in San Francisco where the weather is consistently chilly/windy/cloudy, these sorts of sweaters are used year round.

    Astoria sweater by Seamwork Magazine introduction, working on the sweater | @vintageontap

    Have you made the Astoria sweater? What did you think of the fit? What would you do differently in your next Seamwork Astoria?


    Do you like what you see?

    Never miss a post by following me on Bloglovin’!
    Or go mobile- I’m on Instagram and YouTube!
  • Sewing Vintage Linings, Butterick B5824 [Collab + Video]

    Sewing Vintage Linings, Butterick B5824 [Collab + Video]

    Lapel shot, Butterick B5824 | Vintage on Tap

    Pinup and Vintage style coat, sewing vintage linings | Vintage on Tap

    Beautiful fabric used when sewing a vintage lining | Vintage on Tap

    A coat is only as good as its lining.

    Crazy, I know, but lining a winter coat (especially a twirly one!) can make all the difference when its cold outside and you’re working with heavy fabrics that might lend themselves to fraying. A little boucle, a little tweed, lots of wool- all of it can fray like crazy and a lining that can make the inside as beautiful as the outside can make a world of difference.

    Of course, depending on the type of coat that you make and your local climate, the lining can vary in composition. Charmeuse, silk, cotton- so many different fabrics exist with properties that will support your lifestyle.

    For my Butterick B5824, I went with a polyester- wait whaaaat? But yes! Living in San Francisco can be chilly, but not terribly cold, so with a cotton underlining in my coat, I knew a simple polyester fabric would suffice, as long as it was silky enough to not cling to me as I walked.

    Butterick B5821, Red leopard twirly coat by Christina from Gussets and Godets | Vintage on Tap Butterick B5821, Red leopard twirly coat by Christina from Gussets and Godets | Vintage on Tap Butterick B5821, Red leopard twirly coat by Christina from Gussets and Godets | Vintage on Tap

    This Twirly Coat was in Collaboration with the beautiful Christina from Gussets and Godets! Her coat is gorgeous.

    The red jacket is such a stunning piece and it suits her 100%! Definitely head on over to her post about this to see more photos from her photoshoot, because not gunna lie, she’s rocking it!

    The red makes this VAVAVOOM- and of course the leopard print faux fur lapel gives it that little extra Vintage Girl twist. In regards to sewing linings, she bagged her lining, which is a different technique than I cover in my YouTube video. Bagging a lining can be a bit of a mind game, but she makes it look easy and it helps things stitch up so much faster, too!

    Christina and I went back and forth over what jacket to make for the past couple months for this collab and I’m so glad we went with this one! Granted, lots of hold ups (on my end!) in terms of when we would post our jackets, but in the end, it all came together. During the jacket research part of this project, we also were super shocked at the lack of jacket patterns out there that were super vintage inspired. In the end, we just had to go with Gertie’s design.

    This is my third collaboration for the blog so far and it’s always super fascinating to see how our garments could be from the same pattern, but turn out so differently!

    Baby the Stars Shine Bright umbrella, Butterick B5824, sewing a vintage lining | Vintage on Tap

    Adjusted waist tie, Butterick B5824, with a small peek of the pocket | Vintage on Tap

    Happy in my new plaid coat, Butterick B5824 | Vintage on Tap

    Back view, walking away in my new Butterick B5824 | Vintage on Tap

    Butterick B5824, Interior view | Vintage on Tap

    I took a deep dive into sewing vintage linings for the first time with Butterick B5821.

    It wasn’t as tricky as anticipated, and I’m so happy that I was able to create a video to show others how to do it as well!

    Using my own vintage coats, as well as a 1940s reference book, I taught myself one of the many old school ways of getting this done and I’ll be using that technique moving forward as I work on my 2017 goal of making more coats.

    Lapels, Gertie B5824 | Vintage on Tap

    Beautiful fabric used when sewing a vintage lining | Vintage on Tap

    Interior, lining view after sewing a vintage lining | Vintage on Tap

    I’m so proud to continue to learn new skills, like how to sew more authentically vintage.

    This is such a huge component to my sewing and to my experience as a seamstress. There are thousands of ways to get a technique done- so even after 15 years of sewing, I am still near the tip of the iceberg of everything I can learn and improve upon.

    Recently I got a YouTube comment about how and why I spend so much time doing the tedious things, versus finding the happiness in just sewing and to be honest, it’s the tedious things that bring me joy in what I sew. All of them build up on each other and simply cranking out a project for the sake of cranking it out isn’t very me. I savor the process of doing it by hand and being authentic in my approach.

    Disclaimer: This post contains affiliate links :)

     
    Do you like what you see?
    Never miss a post by following me on Bloglovin’!
    Or go mobile- I’m on Instagram, YouTube, and Snapchat (?vintageontap)!

  • How to Trace Vintage Sewing Patterns

    How to Trace Vintage Sewing Patterns

    How to trace Vintage Sewing Patterns, a tutorial | Vintage on Tap

    If you’re looking for how to trace vintage sewing patterns, my video has you covered!

    Yes yes, the video is a little bit on the longer side, but I go into it. The pros and cons, what tools I use, and why I even bother to trace all my modern ones, too. Its definitely a labor of love, but as I say in the video, keeping the original intact is a Big Deal for me, especially when patterns can easily go out of print or I just don’t want to spend time re-taping a PDF.

    Vintage patterns, on the other hand, should always be traced to keep the original in as pristine condition as possible. Browsing the sewing community, I know there are some outliers who go balls-to-the-wall and just use their originals and to them I say… you’re breaking my heart!

    Time Stamps for a specific pattern-type:

    • 6:38 for PDF patterns
    • 9:37 for commercial patterns
    • 14:24 for vintage patterns

    Patterns used in this tutorial were:

    Tools I used in this tutorial:

    Definitely let me know if this video was helpful for you! I’m considering doing more tutorials in 2017 and making them a regular segment of my YouTube channel. Last year, I received so many questions on how to trace vintage sewing patterns that I couldn’t resist making it my “first” sewing related video of the year (not counting my resolutions post!)

    Do you trace your sewing patterns? Why or why not?


    Do you like what you see?

    Never miss a post by following me on Bloglovin’!
    Or go mobile- I’m on Instagram, YouTube, and Snapchat (?vintageontap)!
    Disclaimer: This post contains affiliate links :)
  • Pinup and Vintage 2017 Sewing Resolutions!

    Pinup and Vintage 2017 Sewing Resolutions!

    My 2017 sewing resolutions are going to make me feel like a beginner again!

    With the techniques I want to learn, I’ll be hitting the sewing books again and going through muslin fabric like nobody’s business. My 2017 sewing resolutions are a big step for me, especially with so much sewing experience behind my back! I’ve actually been avoiding the techniques for quite some time, but it’s time to get myself together and finally expand my sewing repertoire. Definitely watch my latest vlog to see some examples of patterns I’d like to tackle and why.

    Also, my latest video also goes into my projects from 2016, providing a nice little retrospective of a few of my Vintage Pledge pieces and some of the projects that really pushed my sewing skills to the next level last year.

    2017 Sewing Resolutions retrospective, Butterick B5603 Pinup dress, silk dupioni fabric from Britex Fabrics | @VintageonTap

    2017 Sewing Resolutions retrospective, Sewing McCalls M7168 | @vintageontap

    2017 Sewing Resolutions retrospective, Completed Seamwork Alamada Robe | @vintageontap

    Pictured above are my collab post with Allie J, the little red dress project from December, the pinup bathing suit I made in the summer, as well as the Seamwork Almada robe. I love each of them for different reasons and it was nice to be able to look at the huge catalog of garments I’ve made for the website and see how far I’ve come.

    Definitely stick around for my 2017 projects- I can’t wait to tackle some more complicated pieces and demystify the sewing process so that you can make them for yourself!

  • Vintage Simplicity 8252 Winter Dress

    Vintage Simplicity 8252 Winter Dress

    Simplicity 8252, chiffon and crepe fabric | @vintageontap

    Admiring the lights on Fremont Street, Vintage Simplicity 8252 | @vintageontap

    Minor adjustments! Simplicity 8252 | @vintageontap

    Simplicity 8252 pinup dress, back view | @vintageontap

    Simplicity 8252 vintage dress | @vintageontap

    Pinup girl casual evening, Las Vegas, Simplicity 8252 | @vintageontap

    Simplicity 8252, vintage fur coat, pinup girl in Las Vegas | @vintageontap

    Simplicity 8252 is beautiful- but your sewing experience will be tested. 

    I haven’t had a love-hate relationship with a pattern since Butterick B5814 earlier this year– and that’s saying something. With my cocktail dress back in April, there was a lot of blood, sweat, and tears as I sat at my sewing machine for hours and hours, fiddling with boning and uncooperative fabric. Full disclosure- my YouTube vid on B5814 definitely had its share of struggles. Simplicity 8252 was in that same vein, except not as dramatic. Ok well—- maybe a little dramatic.

    The bright side is that Simplicity 8252 is beautiful and the struggle was worth it. I bought this pattern to kick off the holiday season here in the United States but unfortunately, even though I started it back in November, it’s barely finished! The fabrics selected are absolutely outside the norm for vintage-casual. I chose a viscose crepe and polyester chiffon in the color way “moss/nutmeg” from Berkeley’s Stonemountain and Daughter Fabrics. To be honest, I think my main struggles came from the fussy-ness of the fabrics.

    The pattern itself was relatively straight forward to adjust to my measurements. On the dress itself, I performed a FBA, rotating some of the dart fullness to the center pleats. Looking back, I should have also lowered the pleats further down the center front. I also changed the side seam darts to French darts to accommodate my lower bust. For both the redingote and dress I did a swayback adjustment, shortened the torso and skirt length. If you follow me on Instagram and watch my Stories, I did a short series of snaps back in November showing each one of the changes in action (make sure to follow me on IG to not miss out future tutorials!)

    The instructions for Simplicity 8252 were written in a pretty straight forward way, which was a blessing since I spent the majority of time fighting with the fabric. The viscose crepe unraveled an insane amount and was prone to stretching out all around, even with stay stitching. Looking back on it, I should have underlined the entire thing and used organza to stabilize it. After I stitched up the entire dress, I actually had to take apart the side seams in order to take it in, since it had stretched a lot in the width, too. Add to that that I don’t own an overlock machine and finished all the seams with rayon seam binding, sewed in by hand (yikes!)

    The chiffon redingote was all finished up with French seams and slip stitches throughout to wrap up any exposed seams. Unfortunately…

    Accidental cut into my Simplicity 8252 | @vintageontap

    I cut into the main fabric when I was trimming a seam. When this happened, the piece was too far into the entire finished garment that it was too late to turn back and resew that piece. Goes to show that no matter how experienced you are, mistakes happen. In a moment of REALNESS, I got emotional, put the redingote away, and couldn’t look at it for at least 24h. But, the show must go on. Slapped a belt on it and as Tim Gunn says, Made it Work.

    Simplicity 8252, completed vintage dress | @vintageontap

    Now that December is over and done with, I can put it in rotation in January. But I’m glad that in the end it worked out.

    Disclaimer: This post contains affiliate links :)


    Do you like what you see?

    Never miss a post by following me on Bloglovin’!
    Or go mobile- I’m on Instagram, YouTube, and Snapchat (?vintageontap)!
  • How to Sew a Pinup Holiday Dress, Video Tutorial

    How to Sew a Pinup Holiday Dress, Video Tutorial

    Butterick B5603 Pinup dress, silk dupioni fabric from Britex Fabrics | @VintageonTap

    Every girl into 50s fashion should sew a pinup holiday dress.

    In sultry emerald green, sequin black, or shimmery white, sewing a pinup holiday dress is a good excuse to pull out the Fancy Fabric.

    For the version featured in my YouTube tutorial, I used silk.

    I wanted shimmer and fabric with body, so silk dupioni was an amazing choice. It holds its shape super well and rustles in a very luxurious way when I walk. For me, this immediately became a dry-clean only dress, so super special care taken from beginning to end on construction. In this particular fabric, the warp and weft are two different colors, so when I move in the sun, it changes colors.

    Butterick B5603 Pinup dress, silk dupioni fabric from Britex Fabrics | @VintageonTap

    Butterick B5603 Pinup dress, shoulder tie | @VintageonTap

    The pattern I selected for my pinup holiday dress was Butterick B5603, from the 1950s.

    Click to buy the pattern!

    Buy this beautiful Butterick pattern and then watch my sewing tutorial to make your own! | Vintage on Tap

    I decided to go with View B for this dress, with the V-neck (and V-back) and tie top shoulders. There was just something about how elegant the design is that really drew me to it. Also, the nipped in princess lines at the waist are attractive and give a natural slenderness that would look demure and very cute during holiday celebrations.

    If you’re considering this pattern, please read my sewing tips down below!

    Butterick B5603 Pinup dress, back view | @VintageonTap

    Butterick B5603 Pinup dress, Union Square Christmas Tree | @VintageonTap

    Step One: Pay special attention to “Special Occasion” fabrics.

    Before starting to sew, determine the look and feel of the fabric you want to use. If you have a fabric swatch book (click here to learn more about fabric swatches!), look over the options that you may want to work with.

    Questions to ask yourself:

    • Does it have the right texture and drape for the pinup holiday dress you want to make?
    • Have you had the opportunity to work with the fabric before?
    • Will this fabric be dry-clean only, or can you hand or machine wash it?

    Going through the steps to investigate your fabric will help determine how much time, effort, and even how much difficulty you might have in stitching up your pinup holiday dress!

    It’ll also determine the internal foundation that will need to be worked into the sewing process, to make sure that your dress holds its shape and stands the test of time with nights out dancing!

    Butterick B5603 Pinup dress, silk dupioni | @VintageonTap

    Step Two: Read the Underlining and Silk Organza cheat sheet

    After you’ve selected your fabric, spend a few minutes reading the cheat sheet I created for this project. The FREE Underlining and Silk Organza cheat sheet outlines directions for reinforcing and strengthening your garment from the inside out.

    These vintage techniques are essential to sewing a pinup holiday dress. The cheat sheet goes into:

    • How to underline fabric. This is useful when working on special occasion fabrics that might be slippery or difficult to work with. Underlining will make them more stable so you can sew them a lot more quickly.
    • Reinforcing your seams with silk organza. Reinforcing them will reduce stretching on the bias, which can cause the neckline (such as the V-neck of this Butterick B5603 dress) to warp and become distorted.

    Both techniques are useful even past sewing a special occasion dress- they work over all sewing types and are techniques you’ll want to know if you want your garments to last over time.

    To download the cheat sheet, just fill out the form below!

    FREE Checklist PDF!

    Get my checklist for Underlining and Stabilizing with Silk Organza FREE and sent to your inbox!

    Powered by Kit
    Butterick B5603 Pinup dress, made in Britex Fabrics | @VintageonTap

    Step Three: Don’t Rush It.

    Simple, but easy to over look when things are crazy in your corner of the world. Having a festive pinup dress to wear at the end of the year is fantastic, but speed sewing should not be a practice when you’re working on materials that may be more finicky than the standard quilting cotton.

    • Cut fabric one day, start sewing the next. Spending one day cutting out your fabric will ensure that you don’t rush into snipping into the Nice Fabric and accidentally cut things incorrectly. Special occasion fabric can occasionally be costly, and giving cutting time its own time and space will make a difference.
    • When you start sewing, take frequent breaks. Every hour get up to stretch, drink a glass of water and maybe go outside for some fresh air.
    • Don’t work on your pinup holiday dress for more than four to five hours in a day. Similar to the Take Frequent Breaks note, working on the dress in small chunks of time guarantees that when you see it, you’ll be in a good headspace and able to tackle it with fresh eyes every time. This is especially important if you’re working with fabric that can be new to you and/or expensive.

    Butterick B5603 Pinup dress, made in Britex Fabrics | @VintageonTap

    This pinup holiday dress is ready for Christmas or Valentine’s Day.

    This dress was sewn in conjunction with Britex Fabrics, who kindly donated a gorgeous silk dupioni that shimmers gold in the light. Please note that the color fabric I have is SOLD OUT! But there are still plenty of dupioni options available on the Britex website.

    Vintage sewing techniques in this pinup dress include extreme (!!) use of silk organza throughout to prevent warping at the neckline, waist seam, and zipper insertion point. Also, rayon seam binding was used quite a bit. To add extra stability to the entire piece, though, I used silk charmeuse as underlining.

    Be sure to watch the sewing walkthrough video to see how I made this pinup holiday dress from start to finish!

    How to Sew a Pinup Holiday Dress! Video Tutorial and sewing tips | Vintage on Tap

    My B5603 holiday dress was also sewn as part of a collab with…

    Allie J!

    Butterick B5603 dress, made by Allie J | @VintageonTap

    Butterick B5603 dress, made by Allie J | @VintageonTap

    Butterick B5603 dress, made by Allie J | @VintageonTap

    Doesn’t her dress look amazing?

    We decided to tackle the same pattern and give it our own twist. Allie chose version A of Butterick B5603 and I chose version B. Both versions feature a handpicked zipper, and a gored, flared skirt. The instructions for both dresses are nearly the same… except for the approach of the bodice which can give this pattern a totally different feeling!

    Allie goes into her thoughts and experiences sewing version A of this pattern over at her blog; please go check it out!

    I love the textured fabric Allie used for her dress, which gives her garment a super luxe feeling. It’s absolutely her style- very timeless and very classy (reminds me of something First Lady Michelle Obama might wear!) I also like the addition of the second pleated detail on the waist line, which breaks up the long line on the skirt. Allie also runs a mailing list where you can keep up with her different projects and get a behind the scenes look into her life. Click here to subscribe to keep up with Allie! 

    Pin this Post!!

    How to Sew a Pinup Holiday Dress! Video tutorial with tips for making a beautiful dress at home | Vintage on Tap

    Subscribe to Vintage on Tap on YouTube!

    Disclaimer: This post was made possible by Britex Fabrics :) Also, this post contains affiliate links.


    Do you like what you see?

    Never miss a post by following me on Bloglovin’! Or go mobile- I’m on Instagram and  YouTube!

  • The Billie Collection Skirt by The Fold Line

    The Billie Collection Skirt by The Fold Line

    The Fold Line, The Billie Collection Skirt, House of Pinheiro, skirt | Vintage on Tap

    So excited for autumn! The Fold Line, The Billie Collection Skirt, House of Pinheiro, skirt | Vintage on Tap

    The Billie Collection, House of Pinheiro, skirt made in wool | Vintage on Tap

    The Billie Collection, House of Pinheiro, skirt made in wool | Vintage on Tap

    Flowers in San Francisco | Vintage on Tap

    40s pinup style, The Billie Collection by The Fold Line made in grey wool | Vintage on Tap

    Back view with exposed zipper, The Billie Collection by The Fold Line made in grey wool | Vintage on Tap

    Exposed zipper detail, The Billie Collection by The Fold Line made in grey wool | Vintage on Tap

    Pocket fabric detail, House of Pinheiro The Fold Line | Vintage on Tap

    Erstwilder Owl novelty brooch | Vintage on Tap

    Happy for autumn! The Billie Collection skirt by Tribe Patterns | Vintage on Tap

    If you’re building an autumn wardrobe, a good place to start is The Billie Collection Skirt by The Fold Line.

    Seasonal changes for me always start with packing up my off-season clothing and putting it away for next year. There’s nothing quite like only having rich, warm colors and fabrics at your finger tips when you’re ready to rock a pumpkin spice latte (viewer discretion is advised ? ?) But autumn brings more than PSL, though: it brings thick wool fabrics, comfy scarves, and hats.

    While packing things away, I realized that I was missing transitional pieces which are imperative to San Francisco. Luckily, The Fold Line came to the rescue with their new Tribe Patterns venture! It was no coincidence that the moment I was shoving spring clothes into a box in my closet, I got the e-mail from The Fold Line, announcing their collaboration with House of Pinheiro. The Billie Collection is their inaugural collection, “Designed by the Sewing Community”– which I absolutely adore. The next collection is currently being sourced by a competition which closes out on Nov 4th, 2016 and will then be voted on!

    The dress and peplum top are lovely- but I knew The Billie Collection skirt was what I needed, ASAP! Within an hour of buying the pattern, I had all ready printed out the PDF and was taping it together.

    What I loved about the pattern was that it was super straight forward and the directions were written with an intermediate seamstress in mind. There were no unnecessary photos or explanations and everything was “searchable,” meaning that there was enough explanation of each step that doing an online search to find additional information was easy to do. For example, the exposed zipper, which I had never done before. I was able to watch a quick video online and was able to start sewing right away.

    For changes, I added 7″ (17.5cm) in length to make it more suitable to my height and for the season. Also, I changed the hem depth to 1.5″ (3.5cm) which I prefer more in general. I also used rayon hem tape to hand sew my hem in place and used a contrasting rayon printed fabric for the pockets.

    Things that took a little bit of adjusting while I worked on this skirt from The Billie Collection was in the organization of the instructions. The size charts, cutting layouts, and general notes were at the back of the packet and I had to awkwardly look for them every time I needed to reference something. Quick fix, though- just staple those sheets in the front (technically out of order) Also, the instructions for the exposed zipper at the waistband were a little bit awkward as well. I recommend leaving the ends of the waistband open at the Center Back so you can sew the zipper up to the top of the waistband, then fold the waistband down and sew by hand, encasing the zipper completely.

    For pattern adjustments, I didn’t do any, which in general was fine except for the back panels which need a little more… “fullness” for my booty. Not a deal breaker, though, and I will gladly make this piece again.


    Do you like what you see?

    Never miss a post by following me on Bloglovin’!
    Or go mobile- I’m on Instagram, YouTube, and Snapchat (?vintageontap)!

  • Organizing your Sewing Patterns, How to Video

    Organizing your Sewing Patterns, How to Video

    Organizing your sewing patterns, digitally and storing correctly | @vintageontap

    Organizing your Sewing Patterns, tutorial | @vintageontap

    Have you spent time organizing your sewing patterns?

    For someone who sews as much as I do, it was high time that I got myself in order. After spending countless dollars on pattern sales, my storage situation was an absolute wreck: patterns were being shoved into pull drawers and being damaged constantly. If I needed to find a specific pattern, it was time consuming with no discernible organization. I knew it had to stop.

    Materials I talked about in my video:

    My video goes into a step-by-step breakdown of where my collection was being stored, to how I built their new boxes, and how I created dividers to make everything easier to find. The whole process, start to finish, took me an entire day due to the size of my collection, but the transformation to my sewing area and to my workflow has been improved dramatically.

    Organizing your sewing patterns digitally can change EVERYTHING. 

    The beauty of living in the digital age, is that now you can also organize and keep track of your entire collection in the snap of a photo. There are definitely a lot of tools out there that can make this easier, and in my video I go into using Google Photos to make it work.

    Organizing your Sewing Patterns digitally, tutorial | @vintageontap

    Organizing your Sewing Patterns digitally, tutorial | @vintageontap


    Organizing your Sewing Patterns digitally, Google Photos | @vintageontap

    Taking the time to set up Google Photos has all ready made a world of difference, especially if you have a huge stockpile of paper and PDF printed patterns. Being able to find them at a glance to check yardage and notions shaves a lot of time. Add to that, the ability to quickly check if you all ready own a pattern at home when you’re out hitting some sales. If the inspiration strikes, I can pull up a pattern and be inspired immediately and in seconds, be on my way to picking out some new fabric.

    This video was a lot of fun to shoot because it was so practical! There’s still quite a lot of organization I have to do when it comes to my growing sewing stash, but I’ll be taking you on that journey moving forward.

    Disclaimer: This post contains affiliate links :)


    Do you like what you see?
    Never miss a post by following me on Bloglovin’!
    Or go mobile- I’m on Instagram, YouTube, and Snapchat (?vintageontap)!

  • Weightloss as a Seamstress, Revisted

    Weightloss as a Seamstress, Revisted

    It’s been about 1 year since I last wrote about weightloss as a seamstress. 

    What inspired me to write the post initially was that I was trying to find healthy coping mechanisms for my own weight gain. I was trying to understand what that meant for me and my projects– and how to cope in a body positive way.

    Since last year’s post, I’ve gained even more weight- and again, that’s ok. There’s no reason to shame myself for having done so; its natural and happens. What has also changed since last year is that my sewing hours have ramped up and I produce a new garment every couple weeks. The weight gain has not stopped me from taking on projects that are form fitting or that expose a little bit of tummy. Seriously, I made a swimsuit this year and posed for photos in it. I can still pose and be fierce, even with the extra pounds packed on.

    Full disclosure, my best body-affirmation doesn’t come from fashion magazines or traditional media- it actually comes from drag queens. One of my favorite aspects of drag culture is that it encourages you to love yourself at any size and rewards those who can step out of their shell and really “feel the fantasy” (see Drag Race, etc.) Of course even having been a fan of the culture for years still means I have a lot to learn. But that doesn’t mean I can’t channel that happiness and confidence when I’m in public, trying to pose for a photo for the blog, even with a little extra curve on my body.

    Rago Shapewear Girdle, Pinup Weightloss as a Seamstress | @vintageontap


    Being fierce at any size doesn’t mean I don’t want to be healthy, though. 

    I can candidly admit that I do have to lose weight. Not for vanity, but for health. I’ve officially reached my 30s and want to be mobile, healthy, and glowing, especially as this blog grows and grows. The added weight to my height isn’t helping my blood pressure and making steps to improve my longevity can always start now. Like wearing sunscreen.

    Looking back on old posts, there are things I’ve made that I can’t wear right now which really bums me out. All those clothes are sitting in my closet, waiting to be worn. Unfortunately, within the sewing community this part of sewing doesn’t ever get talked about, just swallowed silently as just another adjustment to make on a pattern piece. For all the effort that I made making my clothes, I want that invested energy to be enjoyed every day and not wasted.

    Focusing on weightloss as a seamstress for me means:

    • Feeling happy and confident in the clothes I make
    • Being able to know my body’s dimensions intimately for a better fitting garment
    • Reducing the amount of pattern blending that I’ve been having to do since my weight has increased

    I’ll probably still rock a waist cincher– it’s super pin up and vintage and I enjoy it. I love the silhouette it creates and the authenticity it gives my garments.  An additional challenge will be to flawlessly take in everything I’ve made over the past year.

    I’m ready to experience some weightloss as a seamstress and am actually really looking forward to it. Here’s to a healthy and happy year for me!

  • September 2016 Sewing Pinup Haul

    September 2016 Sewing Pinup Haul

    Urban Decay, Kat Von D, vintage earrings, September 2016 Sewing Pinup Haul | @vintageontap

    Couple vintage-style purses purchased at Goodwill, September 2016 Sewing Pinup Haul | @vintageontap

    Collection of vintage patterns from the Vintage Fashion Fair, September 2016 Sewing Pinup Haul | @vintageontap

    Simplified Systems of Sewing and Styling vintage books from 1948, September 2016 Sewing Pinup Haul | @vintageontap

    Vintage fur trimmed wool coat, purchased at the Vintage Fashion Fair, September 2016 Sewing Pinup Haul | @vintageontap

    My September 2016 Sewing Pinup Haul was a vintage dream!

    I’m so happy with everything I was able to pick up this month! The past few months haven’t been filled with as many vintage goodies as I was able to find on my adventures in September and this haul more than made up for it!

    Vintage shopping specifically is also a good reminder of how many places are cash only and for me, a major annoyance. As much as Cash is King, when it comes to shopping I am super San Francisco/techie about it: I want to pay for everything with my phone! The cash only issue was unfortunately a deterrent in me making some purchases at the San Francisco Vintage Expo, which was a super bummer.


    Items I picked up in September that can be purchased online are below

    Kat Von D Lock-it Setting Powder : Wow wow wow. For someone with dry skin like mine, this is super light weight and works beautifully. Set my make up like crazy. Now if only I can find a small container to preserve the product…?

    Urban Decay All Nighter Long-Lasting Makeup Setting Spray: Still on the fence about it. I do like how when worn over my setting powder it livens it up a little bit and makes me look like less of a powder cake. I haven’t attempted doing my makeup yet without the spray, so haven’t had a chance to do a before and after.

    Simplified Systems of Sewing and Styling: Prices from these books are all over the place! I paid 2.50$ per pamphlet, 20$ total for my set. I’m missing the final 2 pamphlets so might have to bite the bullet and pay the inflated prices on eBay at some point.


    October might be a light month for me haul-wise as any discretionary funds will probably be spent on nothing but luscious winter fabrics. It’s starting to get cold in San Francisco and I’m excited for it!

    Disclaimer: This post contains affiliate links :)


    Do you like what you see?

    Never miss a post by following me on Bloglovin’! Or go mobile- I’m on Instagram, YouTube, and Snapchat (?vintageontap)!