Category: Outerwear

Click the links below to jump to learn about sewing vintage style coats and jackets from specific pattern companies:

  • How to Sew a Vintage Cape, Tutorial with Video

    How to Sew a Vintage Cape, Tutorial with Video

    The Seamwork Camden cape, video walk through, with information on how to upgrade and expand on this great vintage style cape | Vintage on Tap

    As a vintage lover, I’ve wanted to own a vintage cape for as long as I can remember.

    Having a beautiful cape to twirl in, to feel luxurious and fabulous in… really, who wouldn’t want that?

    Unfortunately, for years I convinced myself that buying a cape would be impractical. But then it hit me: why not just make one?

    Vintage-inspired sewing, the Seamwork Camden cape with full vintage style | Vintage on Tap

    Sewing a cape, inspired by a vintage cape from the 40s or 50s  is totally within reach!

    Purchasing a vintage cape sewing pattern on Etsy or eBay can be an eye opener. Prices may range from a cheap 7USD (5£) to a surprisingly expensive 50USD (32£.) Of course, if I you have the option to sew your garment from a vintage cape pattern, I say GO FOR IT!

    BUT– using a modern sewing pattern with vintage sewing techniques can sometimes be more reasonable if you want a retro sewing fix and may not have access to a vintage sewing pattern.

    Sewing a vintage cape, the Seamwork Camden, with bound buttonholes | Vintage on Tap

    Insert the Seamwork Camden Cape!

    The cape is super traditional, with multiple gores to create a retro style that goes well with jeans, too.

    I chose this pattern because I knew I wouldn’t have to try and enlarge a real vintage pattern and because it’s readily available online via PDF.

    Plus, the projects I’ve made from Seamwork have all been reliable, which is extremely important when making a garment like this.

    The Seamwork Camden has tons of customizable pieces to make it more vintage and retro sewing style. Bound buttonholes, and a hand sewn lining to name a few! | Vintage on Tap

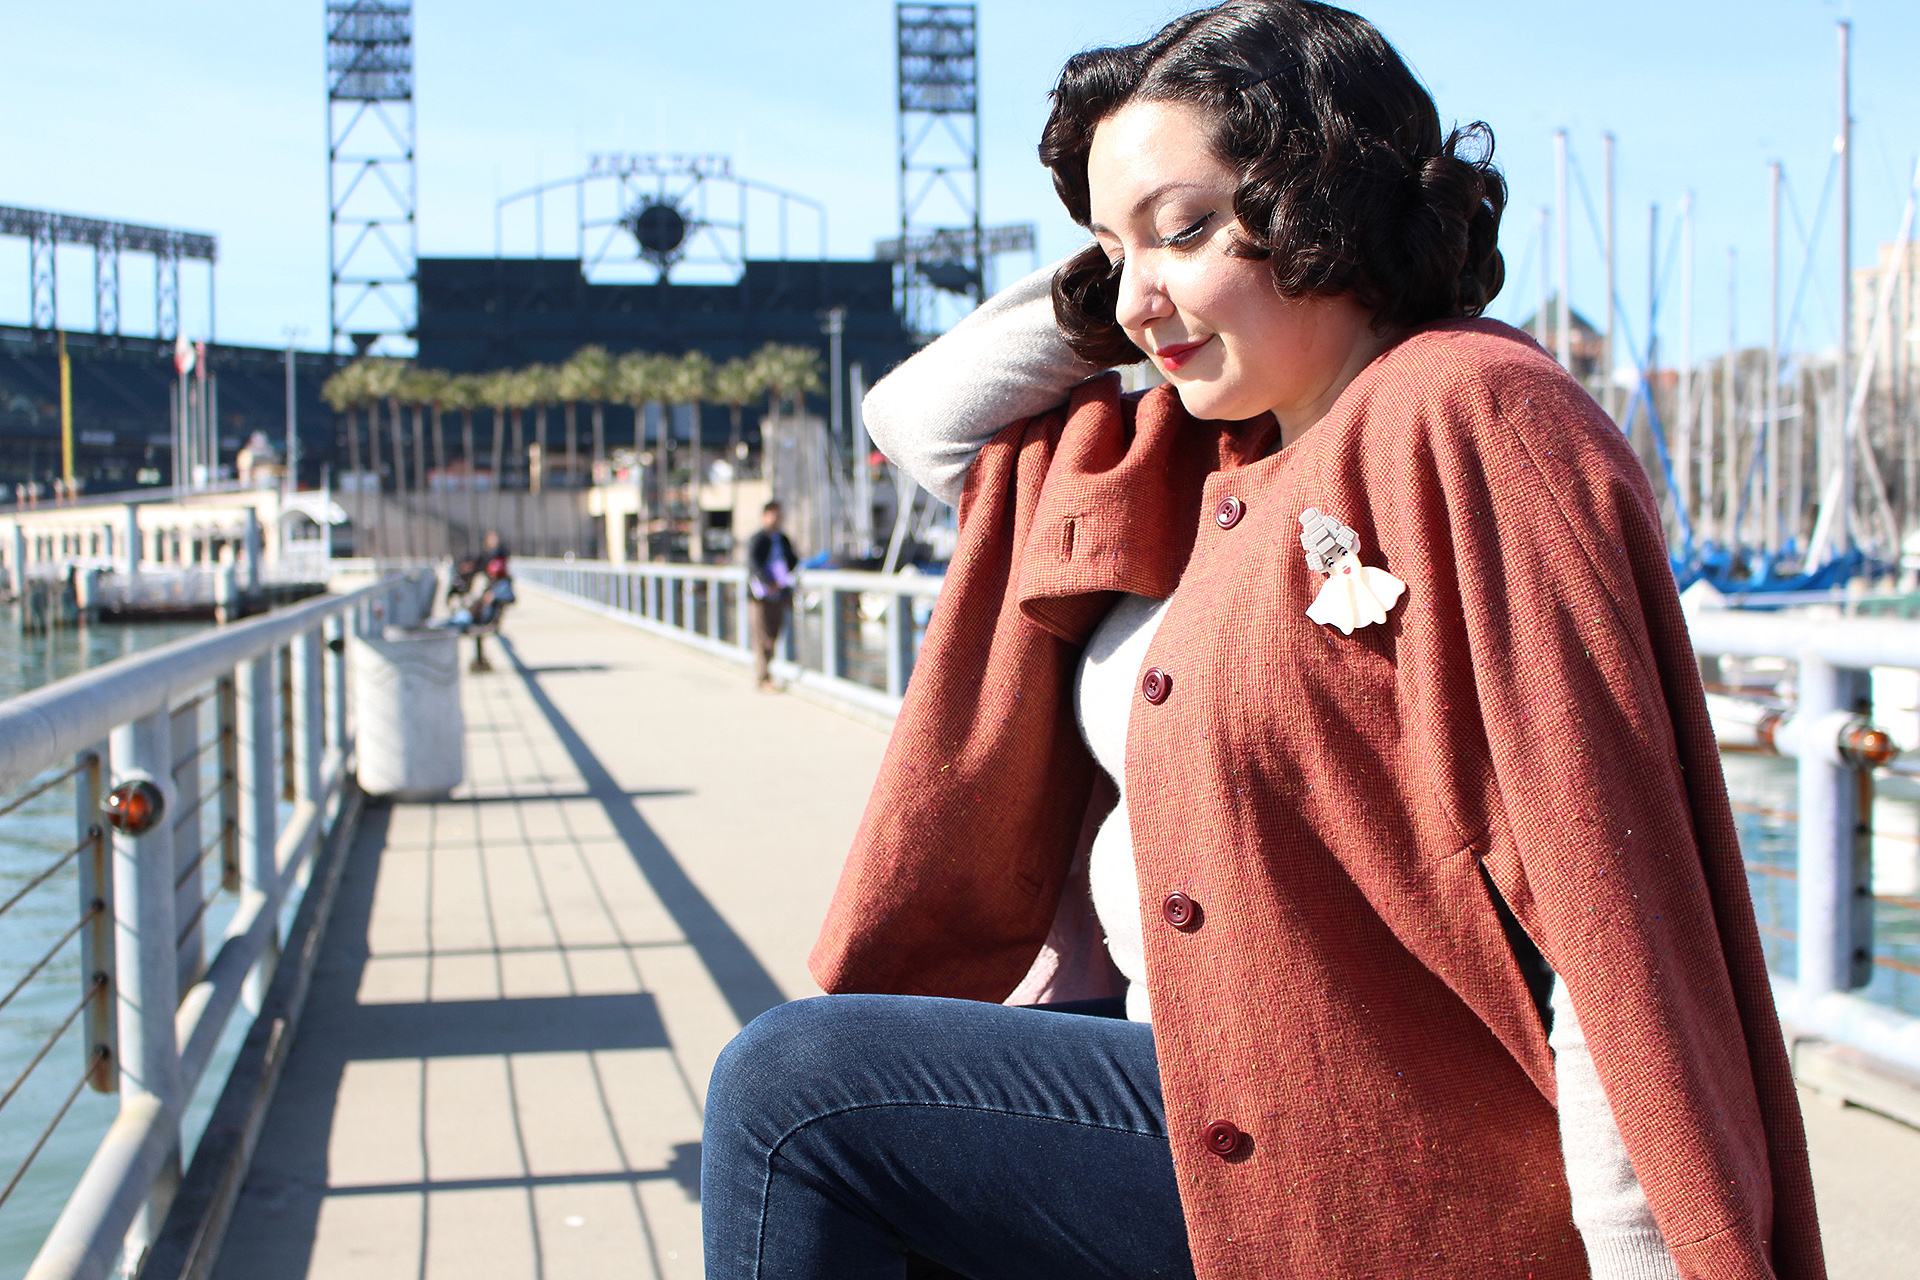
    This Seamwork Magazine cape features lots of cute details!

    1. Comfortable arm holes openings that are placed at a natural place on the garment
    2. Pattern pieces include a full lining
    3. Simple, neckline for casual days– and ample space in case you want to throw a faux-fur collar to dress it up.

    Back view of the Seamwork Camden cape, a gorgeous vintage cape you can make at home | Vintage on Tap

    Front, buttoned up view of the Seamwork Camden cape, a gorgeous piece inspired by vintage and retro capes. Learn how to sew your own with this video tutorial. | Vintage on Tap

    Before getting started…

    Decide what upgrades you might want to make to the Seamwork Camden, to give it more of a vintage cape touch.

    I went out of my way to pull in sewing techniques that would have been present in a vintage cape.

    Never one to settle for a plain garment, I upgraded my pattern in the following ways:

    • Added bound buttonholes to the front, rather than plain machine made buttonholes
    • Drafted a new facing piece, to have a facing that went completely around the neck
    • Stitched in a pocket into the lining, to have an interior double welt pocket
    • Hand sewed my lining in place, using techniques from the 1940s

    How To Sew Bound Buttonholes

    How To Draft Your Own Facing to a Lining

    How to Sew a Lining by Hand, Using Sewing Techniques from the 1940s

    Sewing walkthrough for how to sew a vintage cape in this video tutorial! | Vintage on Tap

    Step One: Pick the Right Fabric for the Job

    Picking the right fabric for a cape cannot be understated! I discuss this in my video tutorial at timestamp 4:21.

    Ask yourself the following questions:

    How do I intend to wear this cape? For casual use, or more as a workhorse, daily cape?

    Depending on your answer, pick lighter or thicker fabrics. For example, if it’s a purely workhorse cape, perhaps a sturdy twill or trenchcoat-like fabric might be nice. If you’re wearing your piece more for the glitz and glam of it, perhaps a sequin fabric or a thinner, more fluttery fabric can be what you’re looking for.

    This also extends to the lining! 

    What’s the weather more likely to be when you wear it?

    In my case, San Francisco doesn’t get too terribly cold and I’ll be pairing this cape up with wool sweaters and long sleeve shirts. I did not underline this piece with a flannel or cotton for insulation and opted for a mid-to-light cotton brushed “wool.”

    If temperatures in your area get extremely cold, definitely insulate your piece! If not, then you are probably ok to proceed as I did in the video tutorial, with no additional underlining.

    Front interior view of the vintage style Seamwork Camden cape | Vintage on Tap

    Step Two: Notches notches notches

    The importance of notches is always imperative to your sewing success! Covered at 2:15 in the video tutorial.

    Remember, notches indicate where pattern pieces fit in relationship to one another– AS WELL AS where two pattern pieces meet. In pieces such as this Camden cape, you’ll be sewing on a curve for most panels, and the notches allow you to see where the two pieces match up to one another.

    If you’ve had to do any fitting adjustments…

    Please be sure to rewalk your pattern pieces to make sure your pieces and notches match. On this vintage style cape, keep an eye out on the following areas:

    • If you’ve shortened or lengthened the piece… That the front shell and lining pattern pieces match the facing
    • If you’ve done a full bust adjustment… That the front shell and lining pattern pieces match the bottom rectangular panel

    Double welt interior pocket on this vintage style cape, the Seamwork Magazine Camden | Vintage on Tap

    Step Three: Identify at what point to incorporate vintage techniques into the sewing process

    The process of upgrading your sewing patterns can seem overwhelming if you haven’t given it a shot before.

    Taking the time before beginning the sewing process, to identify where to incorporate your new vintage elements can save you a lot of heartache down the road.

    For the above listed upgrades, I added them in at the following points:

    Sewing the Seamwork Camden, upgraded with vintage sewing details for a more vintage style cape | Vintage on Tap

    At the pattern drafting stage…

    Complete any fitting adjustments you might like to do. Then, draft your new facing pieces.

    For my Camden cape, I drafted a 2inch wide facing piece that extended from the original facing that ended at the neck, then brought the facing into a gentle curve around the neckline.

    Watch the tutorial on this sewing technique by clicking here

    Fabric detail on this retro inspired cape, the Seamwork Magazine Camden Cape | Vintage on Tap

    Before attaching the front shell piece to anything else…

    Sew your bound buttonholes. The pattern piece will be easier to handle if it’s not attached to the shell, and moving things around your sewing space will be a calmer experience.

    For my Seamwork Camden cape, I opted for the following measurements based off the recommended 3/4″ button:

    • 4 x 4″ squares for the “lips” of the buttonhole
    • 1 1/8 x 3/8″ buttonhole opening

    As noted in my buttonhole tutorial, sew the buttonholes onto the shell piece, and then complete the bound buttonholes later on when the facing has been sewn in place.

    Click here to learn how to sew a bound buttonhole

    Sewing the Seamwork Camden, upgraded with vintage sewing details for a more vintage style cape | Vintage on Tap

    Before attaching the lining to the shell…

    Stitch in your inner double welt pocket. I eyeballed where on my cape I wanted my pocket to be, and then went for it.

    I used the following measurements for my cape, which were large enough to fit an iPhone 7 (not PLUS):

    • 7 x 3″ welt, facing, and interfacing (cut 2 of interfacing)
    • 7 x 12″ pocket lining

    The best tutorial for double welt pockets I found online (that wasn’t mine!) is on the Craftsy website.

    Hand sewn details on the Seamwork Camden cape. Watch this tutorial video to learn how to upgrade your Camden! | Vintage on Tap

    After sewing the facing onto the shell…

    At that point you can attach your lining in by hand. Attaching the lining by hand is a really calm experience and the process of it is extremely forgiving due to the hand sewing of the technique.

    Click here to learn more about hand sewing in a lining

    Front view of the vintage cape, Seamwork Camden, a modern pattern with a retro twist! | Vintage on Tap

    Sewing a vintage cape from a modern pattern is easy to do if you upgrade the pattern and make it more authentic to the time period.

    A lot of modern sewing patterns draw direct inspiration and design from their older counterparts, and simply by including more intentional construction details, you can help merge the two styles seamlessly.

    By incorporating bound buttonholes, hand sewing, and more fully thought out interior designs, you can sew your own vintage cape.

    Pin this Post!!
    How to Sew a Vintage Style Cape, using the Seamwork Camden sewing pattern. This video tutorial breaks down the sewing process and gives you all my tips and tricks to make a cape with authentic sewing techniques! | Vintage on Tap

    All the Places, All the Stuff!

    Never miss a post by following me on Bloglovin’!
    Or go mobile- I’m on Instagram and YouTube!

  • Sewing Vintage Linings, Butterick B5824 [Collab + Video]

    Sewing Vintage Linings, Butterick B5824 [Collab + Video]

    Lapel shot, Butterick B5824 | Vintage on Tap

    Pinup and Vintage style coat, sewing vintage linings | Vintage on Tap

    Beautiful fabric used when sewing a vintage lining | Vintage on Tap

    A coat is only as good as its lining.

    Crazy, I know, but lining a winter coat (especially a twirly one!) can make all the difference when its cold outside and you’re working with heavy fabrics that might lend themselves to fraying. A little boucle, a little tweed, lots of wool- all of it can fray like crazy and a lining that can make the inside as beautiful as the outside can make a world of difference.

    Of course, depending on the type of coat that you make and your local climate, the lining can vary in composition. Charmeuse, silk, cotton- so many different fabrics exist with properties that will support your lifestyle.

    For my Butterick B5824, I went with a polyester- wait whaaaat? But yes! Living in San Francisco can be chilly, but not terribly cold, so with a cotton underlining in my coat, I knew a simple polyester fabric would suffice, as long as it was silky enough to not cling to me as I walked.

    Butterick B5821, Red leopard twirly coat by Christina from Gussets and Godets | Vintage on Tap Butterick B5821, Red leopard twirly coat by Christina from Gussets and Godets | Vintage on Tap Butterick B5821, Red leopard twirly coat by Christina from Gussets and Godets | Vintage on Tap

    This Twirly Coat was in Collaboration with the beautiful Christina from Gussets and Godets! Her coat is gorgeous.

    The red jacket is such a stunning piece and it suits her 100%! Definitely head on over to her post about this to see more photos from her photoshoot, because not gunna lie, she’s rocking it!

    The red makes this VAVAVOOM- and of course the leopard print faux fur lapel gives it that little extra Vintage Girl twist. In regards to sewing linings, she bagged her lining, which is a different technique than I cover in my YouTube video. Bagging a lining can be a bit of a mind game, but she makes it look easy and it helps things stitch up so much faster, too!

    Christina and I went back and forth over what jacket to make for the past couple months for this collab and I’m so glad we went with this one! Granted, lots of hold ups (on my end!) in terms of when we would post our jackets, but in the end, it all came together. During the jacket research part of this project, we also were super shocked at the lack of jacket patterns out there that were super vintage inspired. In the end, we just had to go with Gertie’s design.

    This is my third collaboration for the blog so far and it’s always super fascinating to see how our garments could be from the same pattern, but turn out so differently!

    Baby the Stars Shine Bright umbrella, Butterick B5824, sewing a vintage lining | Vintage on Tap

    Adjusted waist tie, Butterick B5824, with a small peek of the pocket | Vintage on Tap

    Happy in my new plaid coat, Butterick B5824 | Vintage on Tap

    Back view, walking away in my new Butterick B5824 | Vintage on Tap

    Butterick B5824, Interior view | Vintage on Tap

    I took a deep dive into sewing vintage linings for the first time with Butterick B5821.

    It wasn’t as tricky as anticipated, and I’m so happy that I was able to create a video to show others how to do it as well!

    Using my own vintage coats, as well as a 1940s reference book, I taught myself one of the many old school ways of getting this done and I’ll be using that technique moving forward as I work on my 2017 goal of making more coats.

    Lapels, Gertie B5824 | Vintage on Tap

    Beautiful fabric used when sewing a vintage lining | Vintage on Tap

    Interior, lining view after sewing a vintage lining | Vintage on Tap

    I’m so proud to continue to learn new skills, like how to sew more authentically vintage.

    This is such a huge component to my sewing and to my experience as a seamstress. There are thousands of ways to get a technique done- so even after 15 years of sewing, I am still near the tip of the iceberg of everything I can learn and improve upon.

    Recently I got a YouTube comment about how and why I spend so much time doing the tedious things, versus finding the happiness in just sewing and to be honest, it’s the tedious things that bring me joy in what I sew. All of them build up on each other and simply cranking out a project for the sake of cranking it out isn’t very me. I savor the process of doing it by hand and being authentic in my approach.

    Disclaimer: This post contains affiliate links :)

     
    Do you like what you see?
    Never miss a post by following me on Bloglovin’!
    Or go mobile- I’m on Instagram, YouTube, and Snapchat (?vintageontap)!